Toyota Corolla Cross: Removal
REMOVAL
CAUTION / NOTICE / HINT
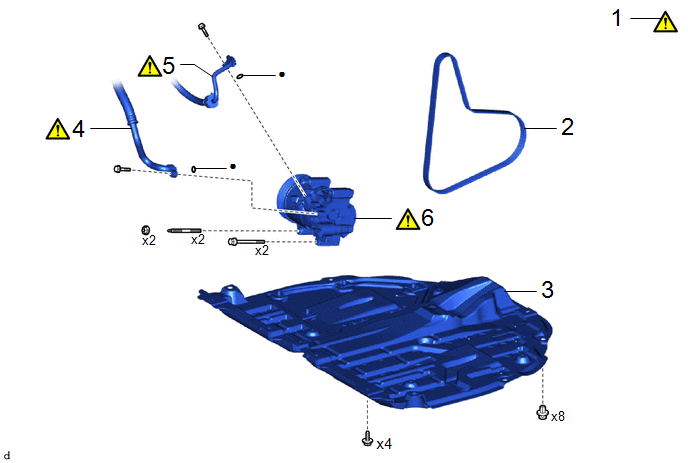
COMPONENTS (REMOVAL)
|
Procedure | Part Name Code |
.png) |
.png) |
 |
|---|---|---|---|---|---|
|
1 | RECOVER REFRIGERANT FROM REFRIGERATION SYSTEM |
- |
|
- | - |
|
2 | FAN AND GENERATOR V BELT |
16361A | - |
- | - |
|
3 | NO. 1 ENGINE UNDER COVER ASSEMBLY |
51410 | - |
- | - |
|
4 | SUCTION HOSE SUB-ASSEMBLY |
88704 |
|
- | - |
|
5 | DISCHARGE HOSE SUB-ASSEMBLY |
88703 |
|
- | - |
|
6 | COMPRESSOR ASSEMBLY WITH PULLEY |
88310 |
|
- | - |
|
● | Non-reusable part |
- | - |
CAUTION / NOTICE / HINT
NOTICE:
If metal dust is produced inside the cooler compressor assembly, it could cause a clog in the modulator. If any metal dust comes out, replace the cooler dryer inside the modulator also.
Click here .gif)
PROCEDURE
1. RECOVER REFRIGERANT FROM REFRIGERATION SYSTEM
Click here
.gif)
2. REMOVE FAN AND GENERATOR V BELT
Click here .gif)
3. REMOVE NO. 1 ENGINE UNDER COVER ASSEMBLY
Click here .gif)
4. DISCONNECT SUCTION HOSE SUB-ASSEMBLY

(1) Remove the bolt to disconnect the suction hose sub-assembly from the compressor assembly with pulley.
(2) Remove the O-ring from the suction hose sub-assembly.
NOTICE:
Seal the openings of the disconnected parts using vinyl tape to prevent moisture and foreign matter from entering them.
5. DISCONNECT DISCHARGE HOSE SUB-ASSEMBLY

(1) Remove the bolt to disconnect the discharge hose sub-assembly from the compressor assembly with pulley.
(2) Remove the O-ring from the discharge hose sub-assembly.
NOTICE:
Seal the openings of the disconnected parts using vinyl tape to prevent moisture and foreign matter from entering them.
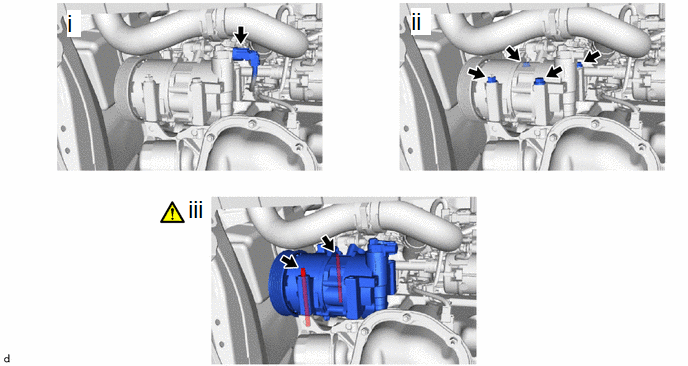
6. REMOVE COMPRESSOR ASSEMBLY WITH PULLEY

(1) Disconnect the connector.
(2) Remove the 2 nuts and 2 bolts.
(3) Using an E8 "TORX" socket wrench, remove the 2 stud bolts and compressor assembly with pulley.


