Toyota Corolla Cross: Disassembly
DISASSEMBLY
CAUTION / NOTICE / HINT
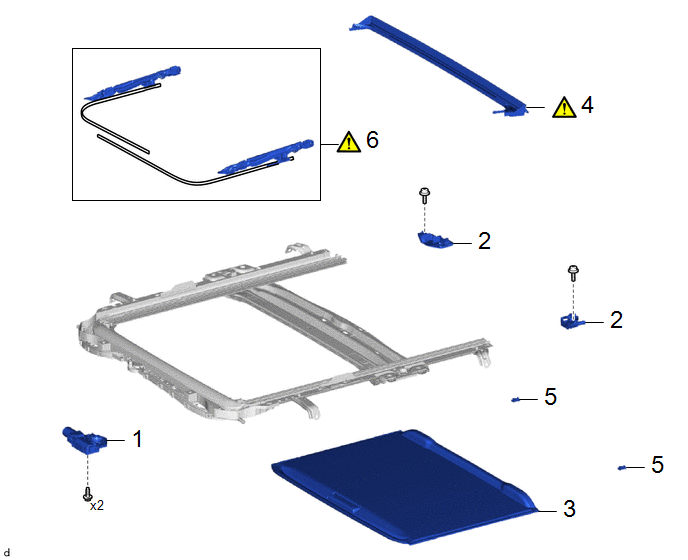
COMPONENTS (DISASSEMBLY)
|
Procedure | Part Name Code |
.png) |
.png) |
 |
|---|---|---|---|---|---|
|
1 | SLIDING ROOF DRIVE GEAR SUB-ASSEMBLY |
63260A | - |
- | - |
|
2 | SLIDING ROOF PIECE SUB-ASSEMBLY |
- | - |
- | - |
|
3 | SUNSHADE TRIM SUB-ASSEMBLY |
63306 | - |
- | - |
|
4 | REAR ROOF DRIP CHANNEL |
- |
|
- | - |
|
5 | REAR NO. 1 SLIDING ROOF SUNSHADE STOPPER |
- | - |
- | - |
|
6 | SLIDING ROOF DRIVE CABLE SUB-ASSEMBLY |
63205A |
|
- | - |
PROCEDURE
1. REMOVE SLIDING ROOF DRIVE GEAR SUB-ASSEMBLY

2. REMOVE SLIDING ROOF PIECE SUB-ASSEMBLY
HINT:
Use the same procedure for the RH side and LH side.

.png) |
Remove in this Direction |
- | - |
3. REMOVE SUNSHADE TRIM SUB-ASSEMBLY

.png) |
Remove in this Direction |
- | - |
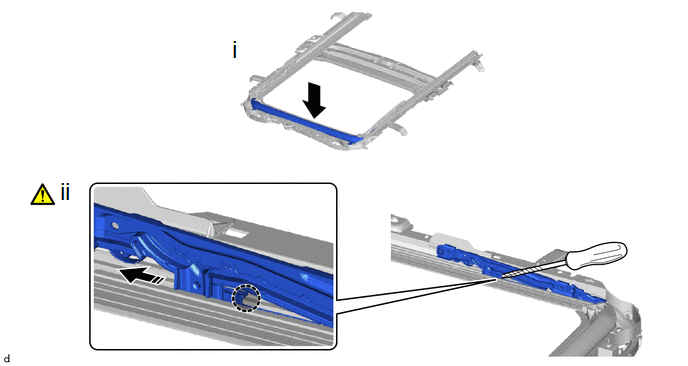
4. REMOVE REAR ROOF DRIP CHANNEL
.png) |
NOTICE: Perform this procedure only when replacement of the sliding roof drive cable sub-assembly is necessary. |

.png) | Remove in this Direction (1) |
.png) |
Remove in this Direction (2) |
 |
Remove in this Direction (3) |
- | - |
(1) Using a screwdriver with its tip wrapped with protective tape, disengage the claws as shown in the illustration.
(2) Using a screwdriver with its tip wrapped with protective tape, disengage the claws as shown in the illustration.
(3) Remove the rear roof drip channel as shown in the illustration.
5. REMOVE REAR NO. 1 SLIDING ROOF SUNSHADE STOPPER

.png) | Remove in this Direction (1) |
.png) |
Remove in this Direction (2) |
6. REMOVE SLIDING ROOF DRIVE CABLE SUB-ASSEMBLY
.png) |
NOTICE: Perform this procedure only when replacement of the sliding roof drive cable sub-assembly is necessary. |

.png) |
Hold Down |
.png) |
Push Position |
.png) |
Remove in this Direction |
- | - |
(1) Hold down the roof wind deflector panel sub-assembly.
(2) Using a screwdriver with its tip wrapped with protective tape, remove the sliding roof drive cable sub-assembly as shown in the illustration.
HINT:
Use the same procedure for the opposite side.

.gif)

