Toyota Corolla Cross: Transfer Case Front Oil Seal (for Rh Side)
Components
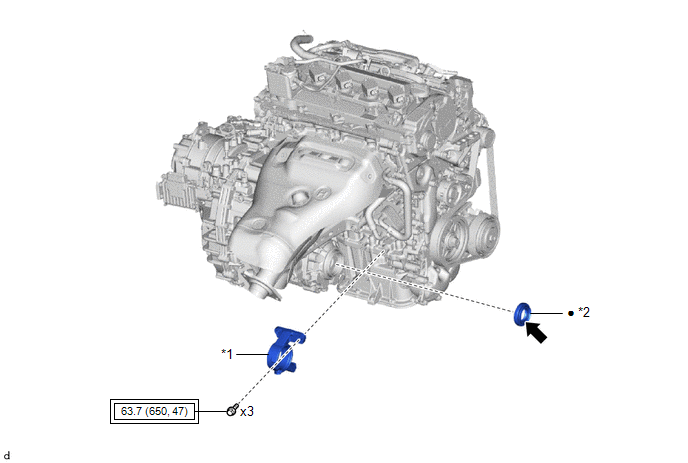
COMPONENTS
ILLUSTRATION

|
*1 |
DRIVE SHAFT BEARING BRACKET |
*2 |
TRANSFER CASE OIL SEAL RH |
.png) |
Tightening torque for "Major areas involving basic vehicle performance such as moving/turning/stopping": N*m (kgf*cm, ft.*lbf) |
● |
Non-reusable part |
.png) |
MP grease |
- |
- |
Replacement
REPLACEMENT
CAUTION / NOTICE / HINT
The necessary procedures (adjustment, calibration, initialization, or registration) that must be performed after parts are removed and installed, or replaced during the transfer case oil seal RH removal/installation are shown below.
Necessary Procedures After Parts Removed/Installed/Replaced|
Replacement Part or Procedure |
Necessary Procedures |
Effect/Inoperative Function When Necessary Procedures are not Performed |
Link |
|---|---|---|---|
|
CVT fluid |
ATF thermal degradation estimate reset |
The value of the Data List item "ATF Thermal Degradation Estimate" is not estimated correctly |
|
|
Bleed air from oil pump (continuously variable transaxle assembly) |
Stop and start system |
|
|
|
Front wheel alignment adjustment |
|
|
|
|
Reset memory |
Dynamic torque control AWD system |
|
|
|
Suspension, tires, etc. |
Rear television camera assembly optical axis (Back camera position setting) |
Parking assist monitor system |
|
|
Initialize headlight ECU sub-assembly LH |
Automatic headlight beam level control system |
|
PROCEDURE
1. REMOVE FRONT DRIVE SHAFT ASSEMBLY RH
Click here .gif)
2. REMOVE DRIVE SHAFT BEARING BRACKET
Click here .gif)
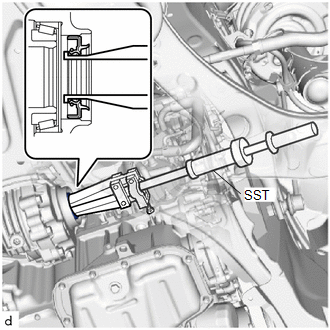
3. REMOVE TRANSFER CASE OIL SEAL RH
|
(a) Using SST, remove the transfer case oil seal RH from the transfer assembly. SST: 09308-00010 NOTICE: Do not scratch the press-fitting surface of the transfer case oil seal RH. |
|
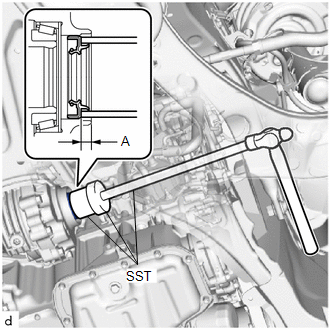
4. INSTALL TRANSFER CASE OIL SEAL RH
(a) Coat the lip of a new transfer case oil seal RH with MP grease.
|
(b) Using SST and a hammer, tap in the transfer case oil seal RH as shown in the illustration. SST: 09631-32020 SST: 09950-60021 09951-00680 SST: 09950-70010 09951-07360 Standard depth (A): 7.5 to 8.5 mm (0.296 to 0.334 in.) NOTICE:
|
|
5. INSTALL DRIVE SHAFT BEARING BRACKET
Click here .gif)
6. INSTALL FRONT DRIVE SHAFT ASSEMBLY RH
Click here .gif)


