Toyota Corolla Cross: Replacement
REPLACEMENT
CAUTION / NOTICE / HINT
The necessary procedures (adjustment, calibration, initialization, or registration) that must be performed after parts are removed and installed, or replaced during the diaphragm oil seal removal/installation are shown below.
Necessary Procedures After Parts Removed/Installed/Replaced|
Replacement Part or Procedure |
Necessary Procedures |
Effect/Inoperative Function When Necessary Procedures are not Performed |
Link |
|---|---|---|---|
|
Rear wheel alignment adjustment |
|
|
|
|
Reset memory |
Dynamic torque control AWD system |
|
|
|
Suspension, tires, etc. |
Rear television camera assembly optical axis (Back camera position setting) |
Parking assist monitor system |
|
|
Initialize headlight ECU sub-assembly LH |
Automatic headlight beam level control system |
|
PROCEDURE
1. REMOVE REAR DIFFERENTIAL CARRIER ASSEMBLY
Click here .gif)
2. REMOVE NO. 7 FLOOR WIRE
Click here
3. REMOVE REAR NO. 1 DIFFERENTIAL SUPPORT
Click here
4. REMOVE REAR NO. 2 DIFFERENTIAL SUPPORT
Click here
5. REMOVE TRANSMISSION COUPLING ASSEMBLY
Click here
6. REMOVE TRANSMISSION COUPLING CONICAL SPRING WASHER
Click here
7. REMOVE TRANSMISSION COUPLING SHIM
Click here
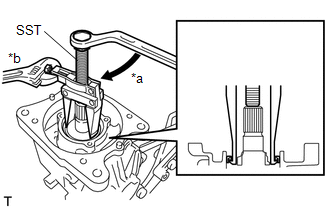
8. REMOVE DIAPHRAGM OIL SEAL
|
(a) Using SST, remove the diaphragm oil seal from the rear differential carrier assembly. SST: 09308-10010 |
|
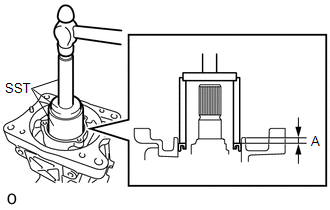
9. INSTALL DIAPHRAGM OIL SEAL
(a) Coat the lip of a new diaphragm oil seal with MP grease.
|
(b) Using SST and a hammer, tap the diaphragm oil seal into the rear differential carrier assembly until it reaches the standard value. SST: 09710-30021 09710-03121 SST: 09950-60011 09951-00570 SST: 09950-70010 09951-07100 Standard depth (A): 6.5 to 7.5 mm (0.256 to 0.295 in.) (from the edge of the rear differential carrier assembly) NOTICE:
|
|
10. INSTALL TRANSMISSION COUPLING SHIM
Click here
11. INSTALL TRANSMISSION COUPLING CONICAL SPRING WASHER
Click here
12. INSTALL TRANSMISSION COUPLING ASSEMBLY
Click here
13. INSTALL REAR NO. 1 DIFFERENTIAL SUPPORT
Click here
14. INSTALL REAR NO. 2 DIFFERENTIAL SUPPORT
Click here
15. INSTALL NO. 7 FLOOR WIRE
16. INSTALL REAR DIFFERENTIAL CARRIER ASSEMBLY
Click here


