Toyota Corolla Cross: Rear Differential Side Gear Shaft Oil Seal
Components
COMPONENTS
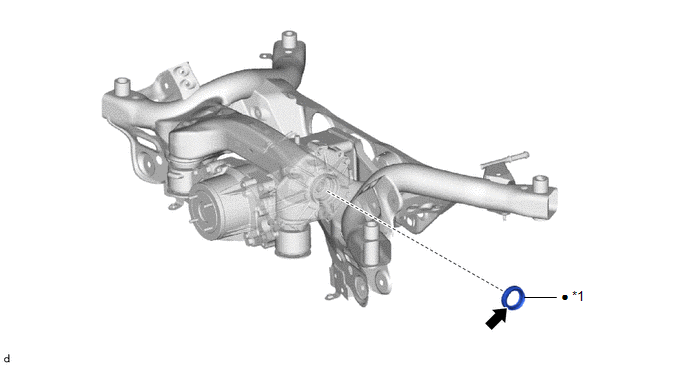
ILLUSTRATION

|
*1 |
REAR DRIVE SHAFT OIL SEAL |
- |
- |
|
● |
Non-reusable part |
.png) |
MP grease |
Replacement
REPLACEMENT
CAUTION / NOTICE / HINT
The necessary procedures (adjustment, calibration, initialization, or registration) that must be performed after parts are removed and installed, or replaced during the rear drive shaft oil seal removal/installation are shown below.
Necessary Procedures After Parts Removed/Installed/Replaced|
Replacement Part or Procedure |
Necessary Procedures |
Effect/Inoperative Function When Necessary Procedures are not Performed |
Link |
|---|---|---|---|
|
Rear wheel alignment adjustment |
|
|
|
|
Reset memory |
Dynamic torque control AWD system |
|
|
|
Suspension, tires, etc. |
Rear television camera assembly optical axis (Back camera position setting) |
Parking assist monitor system |
|
|
Initialize headlight ECU sub-assembly LH |
Automatic headlight beam level control system |
|
HINT:
- Use the same procedure for the RH side and LH side.
- The following procedure is for the LH side.
PROCEDURE
1. REMOVE REAR DRIVE SHAFT ASSEMBLY
Click here .gif)
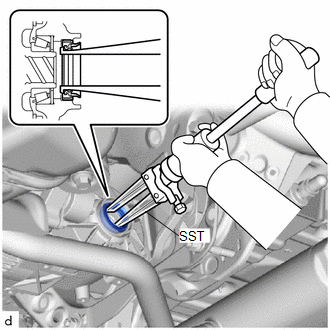
2. REMOVE REAR DRIVE SHAFT OIL SEAL
|
(a) Using SST, remove the rear drive shaft oil seal from the rear differential carrier assembly. SST: 09308-00010 NOTICE: Be careful not to damage the rear differential carrier assembly. |
|
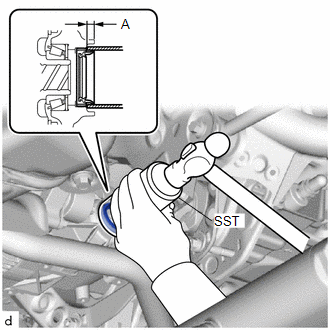
3. INSTALL REAR DRIVE SHAFT OIL SEAL
(a) Coat the lip of a new rear drive shaft oil seal with MP grease.
|
(b) Using SST and a hammer, tap the rear drive shaft oil seal into the rear differential carrier assembly until it reaches the standard value. SST: 09223-00010 Standard depth (A): 6.7 to 7.7 mm (0.264 to 0.303 in.) (from the edge of the rear differential carrier assembly) NOTICE:
|
|
4. INSTALL REAR DRIVE SHAFT ASSEMBLY
Click here .gif)


