Toyota Corolla Cross: Removal
REMOVAL
CAUTION / NOTICE / HINT
COMPONENTS (REMOVAL)
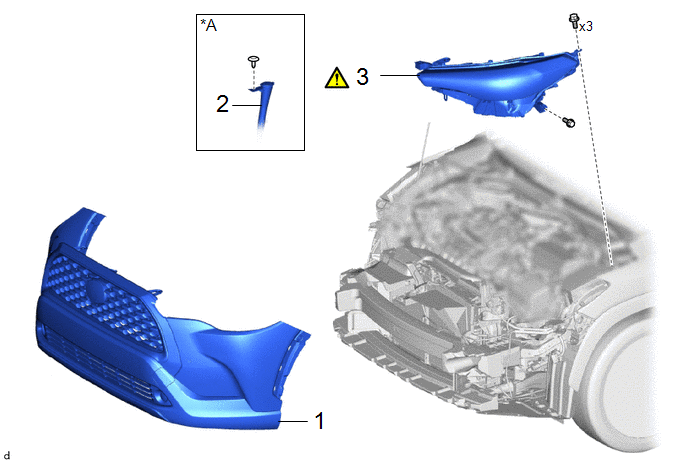
Procedure | Part Name Code |
|
|
|
1 | FRONT BUMPER ASSEMBLY |
- | - |
- | - |
2 | WASHER INLET SUB-ASSEMBLY |
85301 | - |
- | - |
3 | HEADLIGHT ASSEMBLY |
- |
|
- | - |
CAUTION / NOTICE / HINT
HINT:
- Use the same procedure for the RH side and LH side.
- The following procedure is for the LH side.
PROCEDURE
1. REMOVE FRONT BUMPER ASSEMBLY
- for Sport Package:
Click here
- except Sport Package:
Click here
2. SEPARATE WASHER INLET SUB-ASSEMBLY (for RH Side)
3. REMOVE HEADLIGHT ASSEMBLY
|
Remove in this Direction |
- | - |
(1) Apply protective tape around the headlight assembly as shown in the illustration.
(2) Disengage the clamps to disconnect the 4 connectors.
(3) Remove the bolt and 3 screws.
(4) Remove the headlight assembly as shown in the illustration.
READ NEXT:
DISASSEMBLY CAUTION / NOTICE / HINT COMPONENTS (DISASSEMBLY)
Procedure Part Name Code
1 CLEARANCE LIGHT SOCKET
- -
- -
2 CLEARANCE LIGHT BULB
ADJUSTMENT CAUTION / NOTICE / HINT
HINT:
Use the same procedure for the RH side and LH side.
The following procedure is for the LH side.
PROCEDURE 1. PREPARE VEHICLE FOR HEADLIGHT AIM ADJUSTMEN
REASSEMBLY CAUTION / NOTICE / HINT COMPONENTS (REASSEMBLY)
Procedure Part Name Code
1 FRONT SIDE MARKER LIGHT BULB
81710F -
- -
2 FRONT SIDE MAR
SEE MORE:
PROBLEM SYMPTOMS TABLE NOTICE: If the multiplex network door ECU has been removed and installed or replaced, or if any of the connectors has been disconnected, initialize the power back door system.
Click here
HINT:
Use the table below to help determine the cause of problem symptoms. If multip
FREEZE FRAME DATA
FREEZE FRAME DATA
HINT:
When a DTC is stored, the freeze frame data stores the current vehicle (sensor)
state.
The freeze frame data cannot be cleared or updated until the recorded DTCs
are cleared.
Chassis > Tire Pressure Monitor
Tester Display