Toyota Corolla Cross: Removal
REMOVAL
CAUTION / NOTICE / HINT
COMPONENTS (REMOVAL)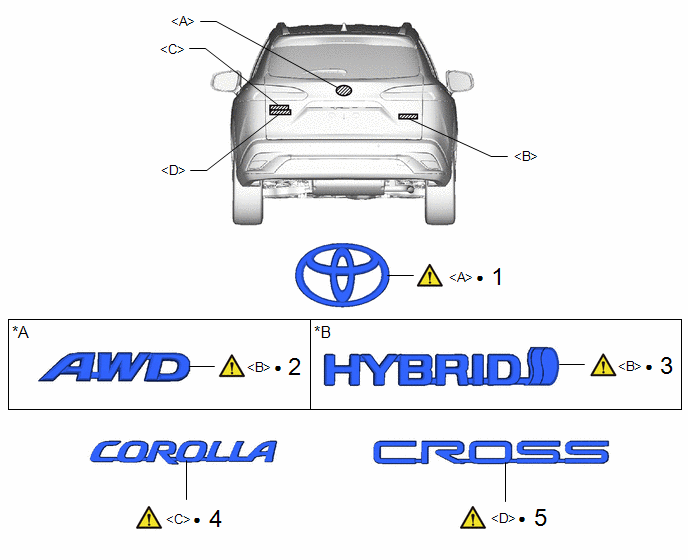
|
Procedure | Part Name Code |
.png) |
.png) |
 |
|---|---|---|---|---|---|
|
1 | SYMBOL EMBLEM |
75741E |
|
- | - |
|
2 | NO. 4 LUGGAGE COMPARTMENT DOOR NAME PLATE |
75444C |
|
- | - |
|
3 | NO. 4 LUGGAGE COMPARTMENT DOOR NAME PLATE |
75444C |
|
- | - |
|
4 | NO. 2 BACK DOOR NAME PLATE |
75442A |
|
- | - |
|
5 | NO. 5 BACK DOOR NAME PLATE |
75445A |
|
- | - |
|
*A | for AWD |
*B | for HEV Model |
|
● | Non-reusable part |
- | - |
|
Procedure | Part Name Code |
|
|
| |
|---|---|---|---|---|---|
|
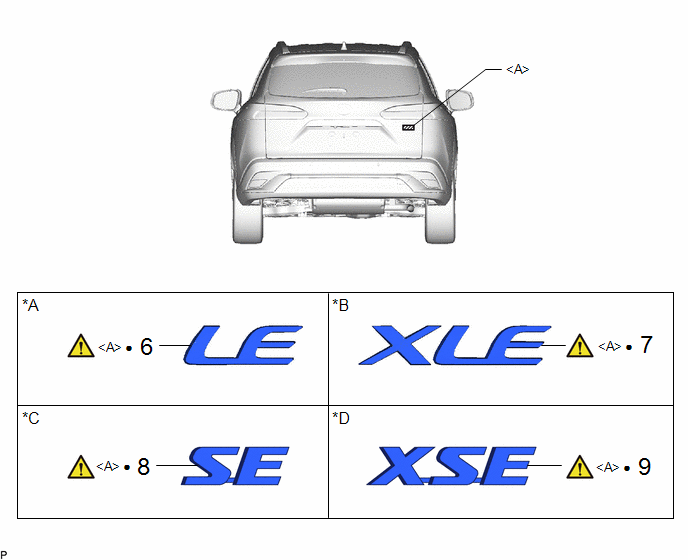
6 | NO. 4 BACK DOOR NAME PLATE |
75444A |
|
- | - |
|
7 | NO. 4 BACK DOOR NAME PLATE |
75444A |
|
- | - |
|
8 | NO. 4 BACK DOOR NAME PLATE |
75444A |
|
- | - |
|
9 | NO. 4 BACK DOOR NAME PLATE |
75444A |
|
- | - |
|
*A | for Type A |
*B | for Type B |
|
*C | for Type C |
*D | for Type D |
|
● | Non-reusable part |
- | - |
|
Procedure | Part Name Code |
|
|
| |
|---|---|---|---|---|---|
|
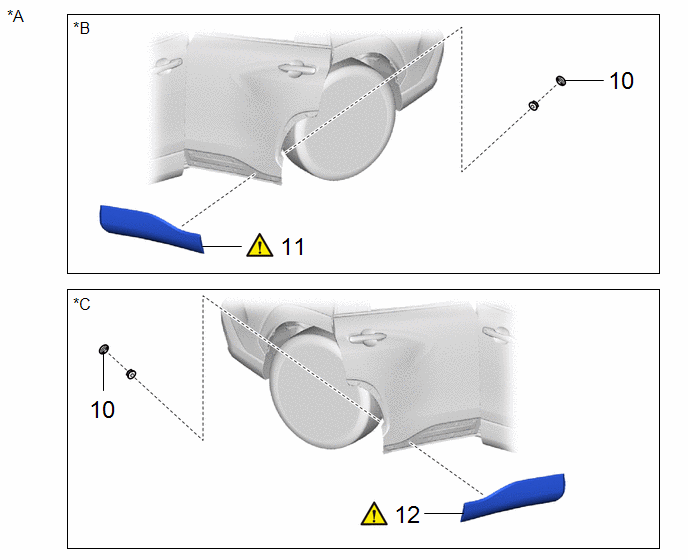
10 | HOLE PLUG |
- | - |
- | - |
|
11 | REAR DOOR OUTSIDE LOWER MOULDING SUB-ASSEMBLY LH |
75078 |
|
- | - |
|
12 | REAR DOOR OUTSIDE LOWER MOULDING SUB-ASSEMBLY RH |
75077 |
|
- | - |
|
*A | for AWD |
*B | for LH Side |
|
*C | for RH Side |
- | - |
|
Procedure | Part Name Code |
|
|
| |
|---|---|---|---|---|---|
|
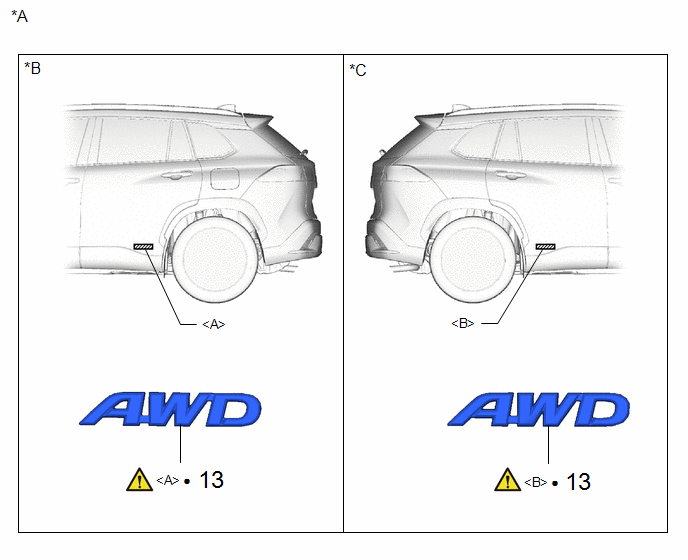
13 | BODY SIDE NAME PLATE |
75473C |
|
- | - |
|
*A | for AWD |
*B | for LH Side |
|
*C | for RH Side |
- | - |
|
● | Non-reusable part |
- | - |
|
|
NOTICE: When removing the name plates or emblems, heat the vehicle body, name plates or emblems using a heat light. |
CAUTION / NOTICE / HINT
Standard:
|
Item | Temperature |
|---|---|
|
Vehicle Body | 40 to 60 °C (104 to 140 °F) |
| 20 to 30°C (68 to 86°F) |
CAUTION:
- Do not touch the heat light and heated parts, touching the heat light may result in burns.
- Touching heated parts for a long time may result in burns.
.png)
|
*a | Heated Part |
|
*b | Heat Light |
NOTICE:
Do not heat vehicle body, name plates or emblems or excessively.
PROCEDURE
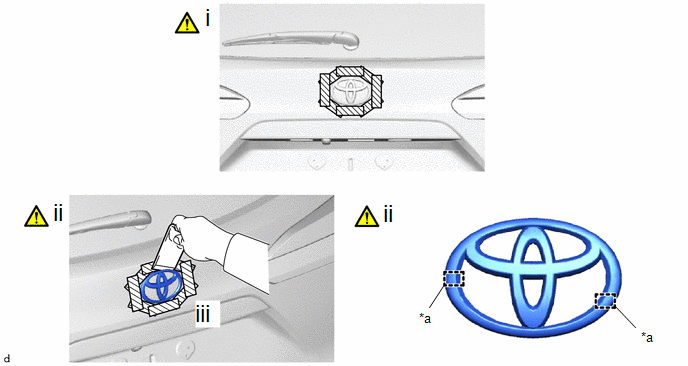
1. REMOVE SYMBOL EMBLEM
|
*a | Location pin |
- | - |
(1) Apply protective tape around the symbol emblem as shown in the illustration.
(2) Using a moulding remover D, separate the double-sided tape and disengage the location pins to remove the symbol emblem.
NOTICE:
Be careful not to damage the vehicle body.
(3) Remove the protective tape.
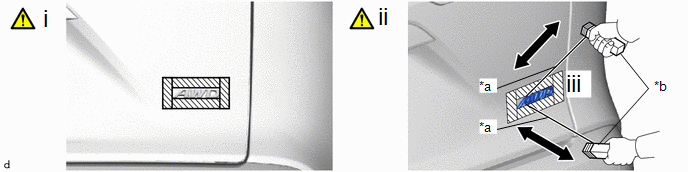
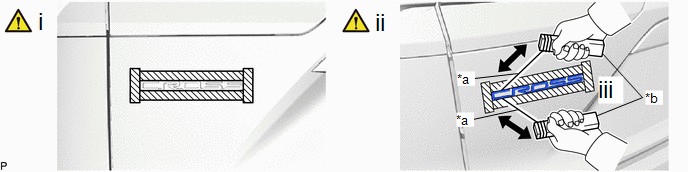
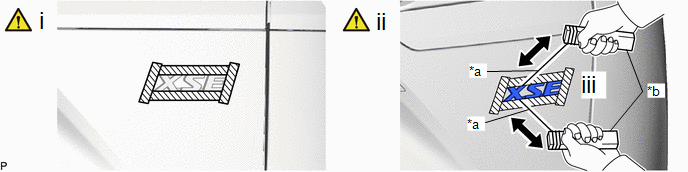
2. REMOVE NO. 4 LUGGAGE COMPARTMENT DOOR NAME PLATE (for AWD)
|
*a | Piano wire |
*b | Wooden Block |
(1) Apply protective tape around the No. 4 luggage compartment door name plate as shown in the illustration.
(2) Remove the No. 4 luggage compartment door name plate.
1. Insert a piano wire between the vehicle body and No. 4 luggage compartment door name plate.
2. Tie objects that can serve as handles (for example, wooden blocks) to both wire ends.
3. Pull the piano wire and cut the double-sided tape that holds the No. 4 luggage compartment door name plate to the vehicle body to remove the No. 4 luggage compartment door name plate.
NOTICE:
Be careful not to damage the vehicle body.
(3) Remove the protective tape.
3. REMOVE NO. 4 LUGGAGE COMPARTMENT DOOR NAME PLATE (for HEV Model)
|
*a | Piano wire |
*b | Wooden Block |
(1) Apply protective tape around the No. 4 luggage compartment door name plate as shown in the illustration.
(2) Remove the No. 4 luggage compartment door name plate.
1. Insert a piano wire between the vehicle body and No. 4 luggage compartment door name plate.
2. Tie objects that can serve as handles (for example, wooden blocks) to both wire ends.
3. Pull the piano wire and cut the double-sided tape that holds the No. 4 luggage compartment door name plate to the vehicle body to remove the No. 4 luggage compartment door name plate.
NOTICE:
Be careful not to damage the vehicle body.
(3) Remove the protective tape.
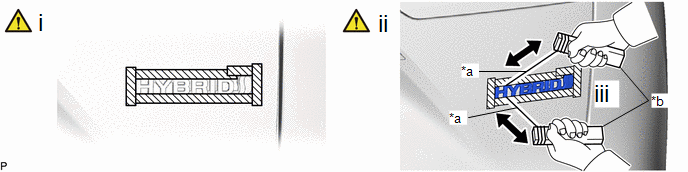
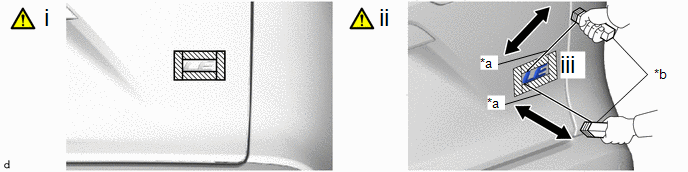
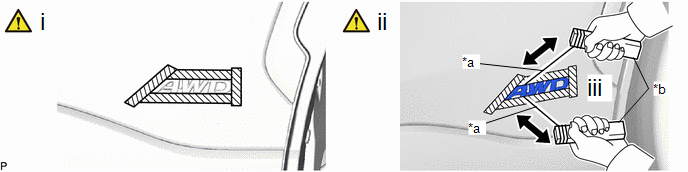
4. REMOVE NO. 2 BACK DOOR NAME PLATE
|
*a | Piano wire |
*b | Wooden Block |
(1) Apply protective tape around the No. 2 back door name plate as shown in the illustration.
(2) Remove the No. 2 back door name plate.
1. Insert a piano wire between the vehicle body and No. 2 back door name plate.
2. Tie objects that can serve as handles (for example, wooden blocks) to both wire ends.
3. Pull the piano wire and cut the double-sided tape that holds the No. 2 back door name plate to the vehicle body to remove the No. 2 back door name plate.
NOTICE:
Be careful not to damage the vehicle body.
(3) Remove the protective tape.
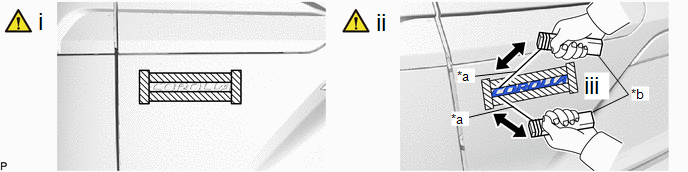
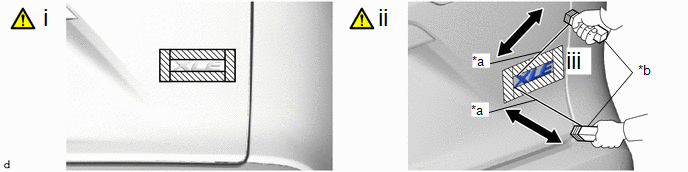
5. REMOVE NO. 5 BACK DOOR NAME PLATE
|
*a | Piano wire |
*b | Wooden Block |
(1) Apply protective tape around the No. 5 back door name plate as shown in the illustration.
(2) Remove the No. 5 back door name plate.
1. Insert a piano wire between the vehicle body and No. 5 back door name plate.
2. Tie objects that can serve as handles (for example, wooden blocks) to both wire ends.
3. Pull the piano wire and cut the double-sided tape that holds the No. 5 back door name plate to the vehicle body to remove the No. 5 back door name plate.
NOTICE:
Be careful not to damage the vehicle body.
(3) Remove the protective tape.
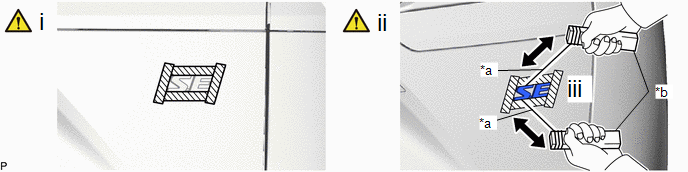
6. REMOVE NO. 4 BACK DOOR NAME PLATE (for Type A)
|
*a | Piano wire |
*b | Wooden Block |
(1) Apply protective tape around the No. 4 back door name plate as shown in the illustration.
(2) Remove the No. 4 back door name plate.
1. Insert a piano wire between the vehicle body and No. 4 back door name plate.
2. Tie objects that can serve as handles (for example, wooden blocks) to both wire ends.
3. Pull the piano wire and cut the double-sided tape that holds the No. 4 back door name plate to the vehicle body to remove the No. 4 back door name plate.
NOTICE:
Be careful not to damage the vehicle body.
(3) Remove the protective tape.
7. REMOVE NO. 4 BACK DOOR NAME PLATE (for Type B)
|
*a | Piano wire |
*b | Wooden Block |
(1) Apply protective tape around the No. 4 back door name plate as shown in the illustration.
(2) Remove the No. 4 back door name plate.
1. Insert a piano wire between the vehicle body and No. 4 back door name plate.
2. Tie objects that can serve as handles (for example, wooden blocks) to both wire ends.
3. Pull the piano wire and cut the double-sided tape that holds the No. 4 back door name plate to the vehicle body to remove the No. 4 back door name plate.
NOTICE:
Be careful not to damage the vehicle body.
(3) Remove the protective tape.
8. REMOVE NO. 4 BACK DOOR NAME PLATE (for Type C)
|
*a | Piano wire |
*b | Wooden Block |
(1) Apply protective tape around the No. 4 back door name plate as shown in the illustration.
(2) Remove the No. 4 back door name plate.
1. Insert a piano wire between the vehicle body and No. 4 back door name plate.
2. Tie objects that can serve as handles (for example, wooden blocks) to both wire ends.
3. Pull the piano wire and cut the double-sided tape that holds the No. 4 back door name plate to the vehicle body to remove the No. 4 back door name plate.
NOTICE:
Be careful not to damage the vehicle body.
(3) Remove the protective tape.
9. REMOVE NO. 4 BACK DOOR NAME PLATE (for Type D)
|
*a | Piano wire |
*b | Wooden Block |
(1) Apply protective tape around the No. 4 back door name plate as shown in the illustration.
(2) Remove the No. 4 back door name plate.
1. Insert a piano wire between the vehicle body and No. 4 back door name plate.
2. Tie objects that can serve as handles (for example, wooden blocks) to both wire ends.
3. Pull the piano wire and cut the double-sided tape that holds the No. 4 back door name plate to the vehicle body to remove the No. 4 back door name plate.
NOTICE:
Be careful not to damage the vehicle body.
(3) Remove the protective tape.
10. REMOVE HOLE PLUG (for AWD)
(a) for LH Side:
Click here
.gif)
(b) for RH Side:
(1) Use the same procedure as for the LH side.
11. REMOVE REAR DOOR OUTSIDE LOWER MOULDING SUB-ASSEMBLY LH (for AWD)
(a) for LH Side:
|
|
Click here |
12. REMOVE REAR DOOR OUTSIDE LOWER MOULDING SUB-ASSEMBLY RH (for AWD)
(a) for RH Side:
(1) Use the same procedure as for the LH side.
13. REMOVE BODY SIDE NAME PLATE (for AWD)
|
*a | Piano wire |
*b | Wooden Block |
(1) Apply protective tape around the body side name plate as shown in the illustration.
(2) Remove the body side name plate.
1. Insert a piano wire between the vehicle body and body side name plate.
2. Tie objects that can serve as handles (for example, wooden blocks) to both wire ends.
3. Pull the piano wire and cut the double-sided tape that holds the body side name plate to the vehicle body to remove the body side name plate.
NOTICE:
Be careful not to damage the vehicle body.
(3) Remove the protective tape.
(4) Use the same procedure as for the LH side.


