Toyota Corolla Cross: Installation
INSTALLATION
CAUTION / NOTICE / HINT
COMPONENTS (INSTALLATION)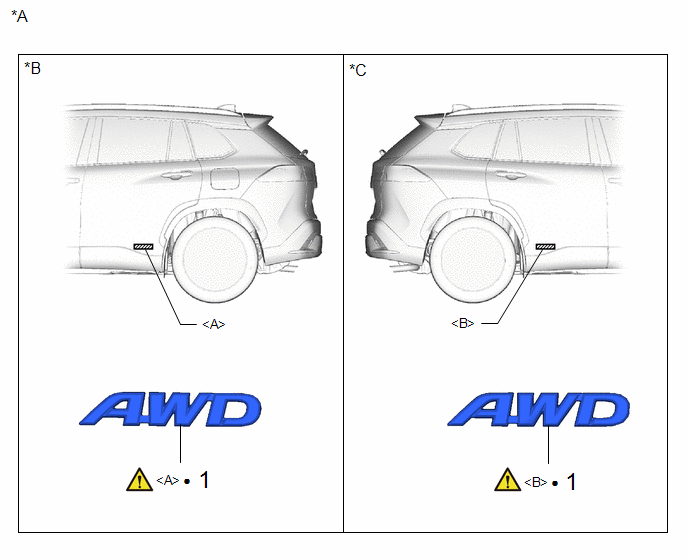
|
Procedure | Part Name Code |
.png) |
.png) |
 |
|---|---|---|---|---|---|
|
1 | BODY SIDE NAME PLATE |
75473C |
|
- | - |
.gif)
|
*A | for AWD |
*B | for LH Side |
|
*C | for RH Side |
- | - |
|
● | Non-reusable part |
- | - |
|
Procedure | Part Name Code |
|
|
| |
|---|---|---|---|---|---|
|
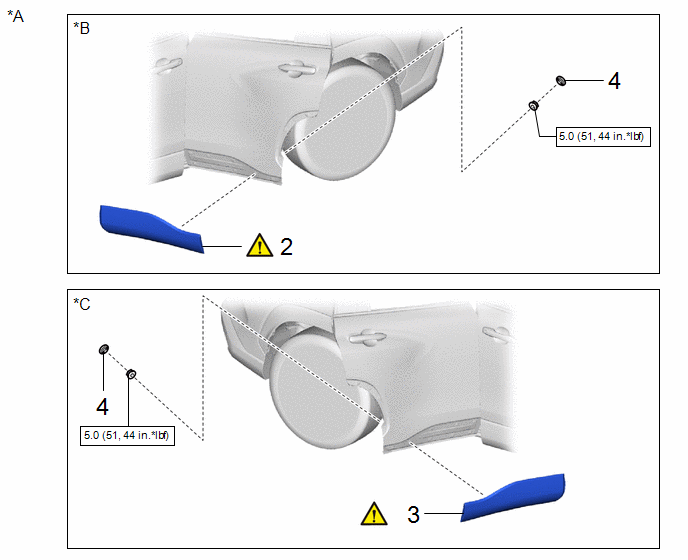
2 | REAR DOOR OUTSIDE LOWER MOULDING SUB-ASSEMBLY LH |
75078 | - |
- | - |
|
3 | REAR DOOR OUTSIDE LOWER MOULDING SUB-ASSEMBLY RH |
75077 | - |
- | - |
|
4 | HOLE PLUG |
- | - |
- | - |
|
*A | for AWD |
*B | for LH Side |
|
*C | for RH Side |
- | - |
.png) |
N*m (kgf*cm, ft.*lbf): Specified torque |
● | Non-reusable part |
|
Procedure | Part Name Code |
|
|
| |
|---|---|---|---|---|---|
|
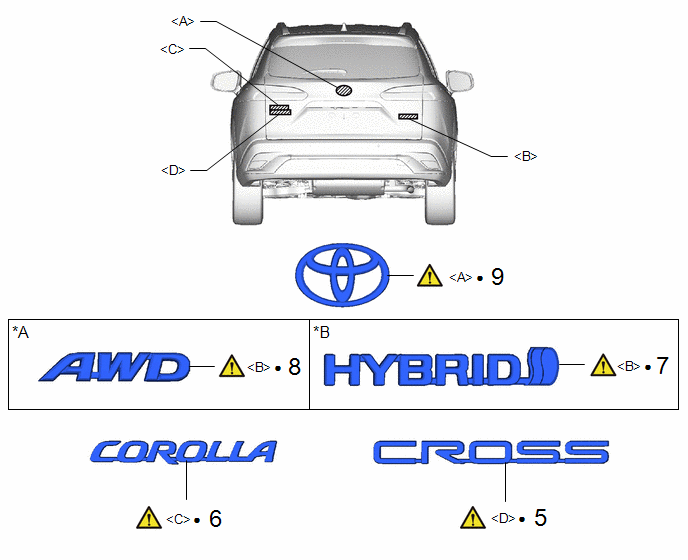
5 | NO. 5 BACK DOOR NAME PLATE |
75445A |
|
- | - |
|
6 | NO. 2 BACK DOOR NAME PLATE |
75442A |
|
- | - |
|
7 | NO. 4 LUGGAGE COMPARTMENT DOOR NAME PLATE |
75444C |
|
- | - |
|
8 | NO. 4 LUGGAGE COMPARTMENT DOOR NAME PLATE |
75444C |
|
- | - |
|
9 | SYMBOL EMBLEM |
75741E |
|
- | - |
|
*A | for AWD |
*B | for HEV Model |
|
● | Non-reusable part |
- | - |
|
Procedure | Part Name Code |
|
|
| |
|---|---|---|---|---|---|
|
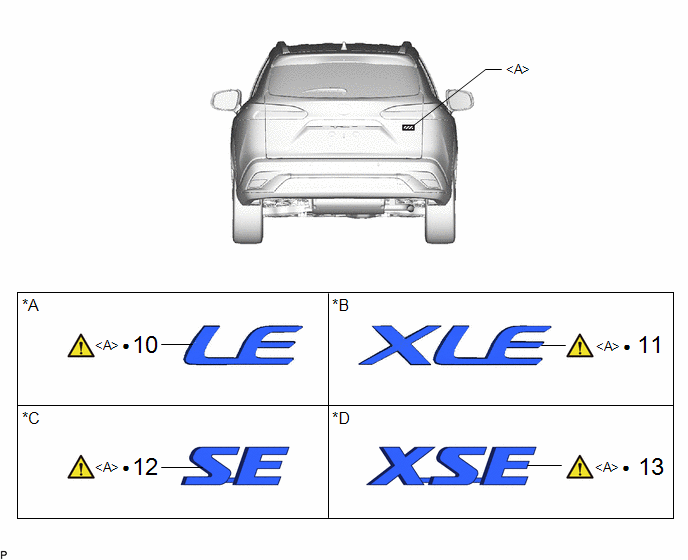
10 | NO. 4 BACK DOOR NAME PLATE |
75444A |
|
- | - |
|
11 | NO. 4 BACK DOOR NAME PLATE |
75444A |
|
- | - |
|
12 | NO. 4 BACK DOOR NAME PLATE |
75444A |
|
- | - |
|
13 | NO. 4 BACK DOOR NAME PLATE |
75444A |
|
- | - |
|
*A | for Type A |
*B | for Type B |
|
*C | for Type C |
*D | for Type D |
|
● | Non-reusable part |
- | - |
|
|
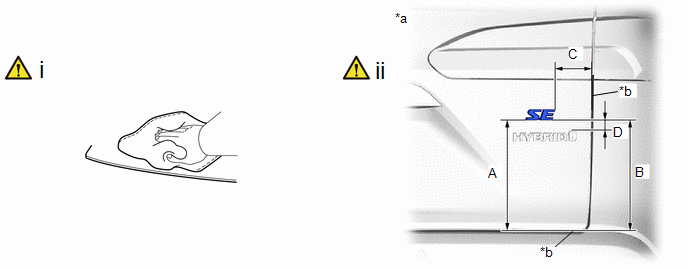
NOTICE: When installing the new name plates or emblems, heat the vehicle body, name plates or emblems using a heat light. |
CAUTION / NOTICE / HINT
Standard:
|
Item | Temperature |
|---|---|
|
Vehicle Body | 40 to 60 °C (104 to 140 °F) |
| 20 to 30°C (68 to 86°F) |
CAUTION:
- Do not touch the heat light and heated parts, touching the heat light may result in burns.
- Touching heated parts for a long time may result in burns.
.png)
|
*a | Heated Part |
|
*b | Heat Light |
NOTICE:
Do not heat vehicle body, name plates or emblems excessively.
PROCEDURE
1. INSTALL BODY SIDE NAME PLATE (for AWD)
(a) for LH Side:
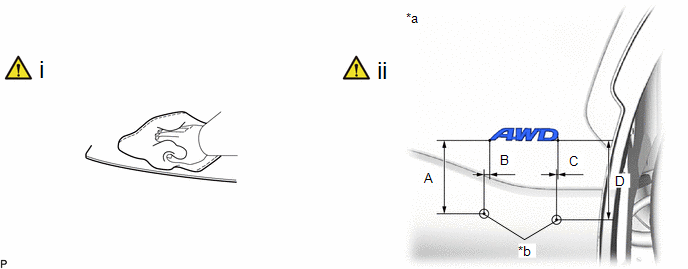
|
*a | Reference Values |
*b | Center of Hole |
Standard Measurement:
|
Area | Measurement |
Area | Measurement |
|---|---|---|---|
|
A | 88.6 mm (3.488 in.) |
B | 8.0 mm (0.315 in.) |
|
C | 2.2 mm (0.087 in.) |
D | 97 mm (3.819 in.) |
(1) Clean the vehicle body surface.
1. Using a heat light, heat the vehicle body surface.
2. Remove any remaining double-sided tape from the vehicle body.
3. Wipe off any tape adhesive residue with cleaner.
NOTICE:
- Installing the body side name plate with some double-sided tape remaining may cause poor adhesion. Perform this procedure until the tape is sufficiently removed.
- Make sure to use a cloth when removing. Using a screwdriver, etc., may cause damage and poor adhesion.
(2) Install a new body side name plate.
1. Using a heat light, heat the vehicle body and body side name plate.
2. Remove the release paper from the body side name plate.
HINT:
After removing the release paper, keep the exposed adhesive free from foreign matter.
3. Install the body side name plate as shown in the illustration.
HINT:
Press the body side name plate firmly to install it.
(b) for RH Side:
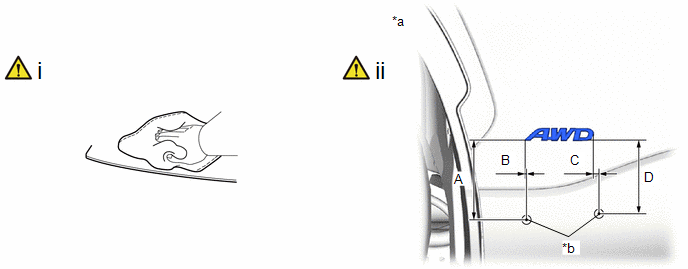
|
*a | Reference Values |
*b | Center of Hole |
Standard Measurement:
|
Area | Measurement |
Area | Measurement |
|---|---|---|---|
|
A | 97 mm (3.819 in.) |
B | 1.2 mm (0.047 in.) |
|
C | 4.5 mm (0.177 in.) |
D | 88.6 mm (3.488 in.) |
(1) Clean the vehicle body surface.
1. Using a heat light, heat the vehicle body surface.
2. Remove any remaining double-sided tape from the vehicle body.
3. Wipe off any tape adhesive residue with cleaner.
NOTICE:
- Installing the body side name plate with some double-sided tape remaining may cause poor adhesion. Perform this procedure until the tape is sufficiently removed.
- Make sure to use a cloth when removing. Using a screwdriver, etc., may cause damage and poor adhesion.
(2) Install a new body side name plate.
1. Using a heat light, heat the vehicle body and body side name plate.
2. Remove the release paper from the body side name plate.
HINT:
After removing the release paper, keep the exposed adhesive free from foreign matter.
3. Install the body side name plate as shown in the illustration.
HINT:
Press the body side name plate firmly to install it.
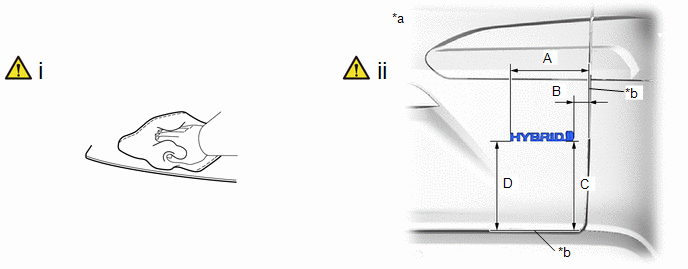
2. INSTALL REAR DOOR OUTSIDE LOWER MOULDING SUB-ASSEMBLY LH (for AWD)
3. INSTALL REAR DOOR OUTSIDE LOWER MOULDING SUB-ASSEMBLY RH (for AWD)
4. INSTALL HOLE PLUG (for AWD)
5. INSTALL NO. 5 BACK DOOR NAME PLATE
|
*a | Reference Values |
*b | End of R |
Standard Measurement:
|
Area | Measurement |
Area | Measurement |
|---|---|---|---|
|
A | 47.5 mm (1.870 in.) |
B | 209.6 mm (8.252 in.) |
|
C | 230.9 mm (9.091 in.) |
D | 233.3 mm (9.185 in.) |
(1) Clean the vehicle body surface.
1. Using a heat light, heat the vehicle body surface.
2. Remove any remaining double-sided tape from the vehicle body.
3. Wipe off any tape adhesive residue with cleaner.
NOTICE:
- Installing the No. 5 back door name plate with some double-sided tape remaining may cause poor adhesion. Perform this procedure until the tape is sufficiently removed.
- Make sure to use a cloth when removing. Using a screwdriver, etc., may cause damage and poor adhesion.
(2) Install a new No. 5 back door name plate.
1. Using a heat light, heat the vehicle body and No. 5 back door name plate.
2. Remove the release paper from the No. 5 back door name plate.
HINT:
After removing the release paper, keep the exposed adhesive free from foreign matter.
3. Install the No. 5 back door name plate as shown in the illustration.
HINT:
Press the No. 5 back door name plate firmly to install it.
6. INSTALL NO. 2 BACK DOOR NAME PLATE
|
*a | Reference Values |
*b | End of R |
Standard Measurement:
|
Area | Measurement |
Area | Measurement |
|---|---|---|---|
|
A | 49.1 mm (1.933 in.) |
B | 178.1 mm (7.012 in.) |
|
C | 255.4 mm (10.055 in.) |
D | 258.2 mm (10.165 in.) |
(1) Clean the vehicle body surface.
1. Using a heat light, heat the vehicle body surface.
2. Remove any remaining double-sided tape from the vehicle body.
3. Wipe off any tape adhesive residue with cleaner.
NOTICE:
- Installing the No. 2 back door name plate with some double-sided tape remaining may cause poor adhesion. Perform this procedure until the tape is sufficiently removed.
- Make sure to use a cloth when removing. Using a screwdriver, etc., may cause damage and poor adhesion.
(2) Install a new No. 2 back door name plate.
1. Using a heat light, heat the vehicle body and No. 2 back door name plate.
2. Remove the release paper from the No. 2 back door name plate.
HINT:
After removing the release paper, keep the exposed adhesive free from foreign matter.
3. Install the No. 2 back door name plate as shown in the illustration.
HINT:
Press the No. 2 back door name plate firmly to install it.
7. INSTALL NO. 4 LUGGAGE COMPARTMENT DOOR NAME PLATE (for HEV Model)
|
*a | Reference Values |
*b | End of R |
Standard Measurement:
|
Area | Measurement |
Area | Measurement |
|---|---|---|---|
|
A | 165.6 mm (6.520 in.) |
B | 29.7 mm (1.169 in.) |
|
C | 190.6 mm (7.504 in.) |
D | 186.9 mm (7.358 in.) |
(1) Clean the vehicle body surface.
1. Using a heat light, heat the vehicle body surface.
2. Remove any remaining double-sided tape from the vehicle body.
3. Wipe off any tape adhesive residue with cleaner.
NOTICE:
- Installing the No. 4 luggage compartment door name plate with some double-sided tape remaining may cause poor adhesion. Perform this procedure until the tape is sufficiently removed.
- Make sure to use a cloth when removing. Using a screwdriver, etc., may cause damage and poor adhesion.
(2) Install a new No. 4 luggage compartment door name plate.
1. Using a heat light, heat the vehicle body and No. 4 luggage compartment door name plate.
2. Remove the release paper from the No. 4 luggage compartment door name plate.
HINT:
After removing the release paper, keep the exposed adhesive free from foreign matter.
3. Install the No. 4 luggage compartment door name plate as shown in the illustration.
HINT:
Press the No. 4 luggage compartment door name plate firmly to install it.
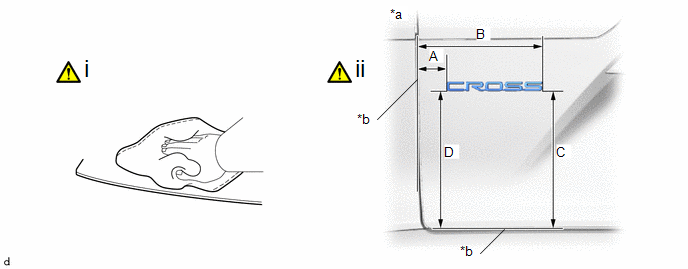
8. INSTALL NO. 4 LUGGAGE COMPARTMENT DOOR NAME PLATE (for AWD)
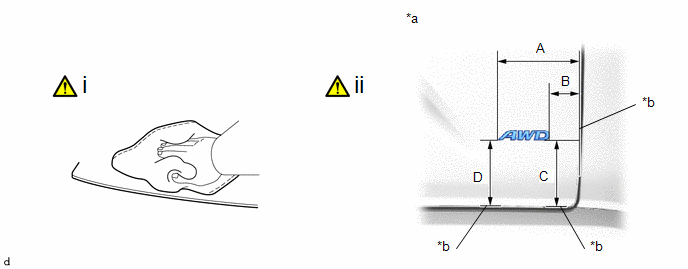
|
*a | Reference Values |
*b | End of R |
Standard Measurement:
|
Area | Measurement |
Area | Measurement |
|---|---|---|---|
|
A | 144 mm (5.669 in.) |
B | 55.5 mm (2.185 in.) |
|
C | 188.9 mm (7.437 in.) |
D | 186.5 mm (7.343 in.) |
(1) Clean the vehicle body surface.
1. Using a heat light, heat the vehicle body surface.
2. Remove any remaining double-sided tape from the vehicle body.
3. Wipe off any tape adhesive residue with cleaner.
NOTICE:
- Installing the No. 4 luggage compartment door name plate with some double-sided tape remaining may cause poor adhesion. Perform this procedure until the tape is sufficiently removed.
- Make sure to use a cloth when removing. Using a screwdriver, etc., may cause damage and poor adhesion.
(2) Install a new No. 4 luggage compartment door name plate.
1. Using a heat light, heat the vehicle body and No. 4 luggage compartment door name plate.
2. Remove the release paper from the No. 4 luggage compartment door name plate.
HINT:
After removing the release paper, keep the exposed adhesive free from foreign matter.
3. Install the No. 4 luggage compartment door name plate as shown in the illustration.
HINT:
Press the No. 4 luggage compartment door name plate firmly to install it.
9. INSTALL SYMBOL EMBLEM

|
*a | Location Pin |
- | - |
(1) Clean the vehicle body surface.
1. Using a heat light, heat the vehicle body surface.
2. Remove any remaining double-sided tape from the vehicle body.
3. Wipe off any tape adhesive residue with cleaner.
NOTICE:
- Installing the symbol emblem with some double-sided tape remaining may cause poor adhesion. Perform this procedure until the tape is sufficiently removed.
- Make sure to use a cloth when removing. Using a screwdriver, etc., may cause damage and poor adhesion.
(2) Install a new symbol emblem.
1. Using a heat light, heat the vehicle body and symbol emblem.
2. Remove the release paper from the symbol emblem.
HINT:
After removing the release paper, keep the exposed adhesive free from foreign matter.
3. Engage the location pins to install the symbol emblem as shown in the illustration..
HINT:
Press the symbol emblem firmly to install it.
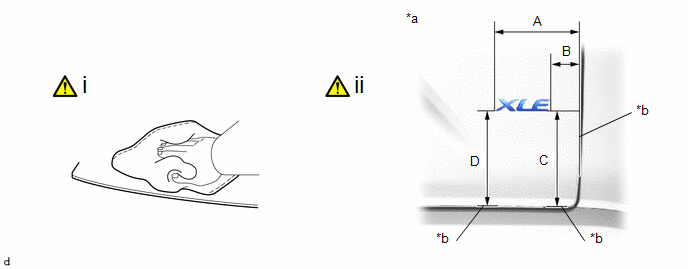
10. INSTALL NO. 4 BACK DOOR NAME PLATE (for Type A)
|
*a | Reference Values |
*b | End of R |
Standard Measurement:
|
Area | Measurement |
Area | Measurement |
|---|---|---|---|
|
A | 123.7 mm (4.870 in.) |
B | 65 mm (2.559 in.) |
|
C | 232.5 mm (9.154 in.) |
D | 230.7 mm (9.083 in.) |
(1) Clean the vehicle body surface.
1. Using a heat light, heat the vehicle body surface.
2. Remove any remaining double-sided tape from the vehicle body.
3. Wipe off any tape adhesive residue with cleaner.
NOTICE:
- Installing the No. 4 back door name plate with some double-sided tape remaining may cause poor adhesion. Perform this procedure until the tape is sufficiently removed.
- Make sure to use a cloth when removing. Using a screwdriver, etc., may cause damage and poor adhesion.
(2) Install a new No. 4 back door name plate.
1. Using a heat light, heat the vehicle body and No. 4 back door name plate.
2. Remove the release paper from the No. 4 back door name plate.
HINT:
After removing the release paper, keep the exposed adhesive free from foreign matter.
3. Install the No. 4 back door name plate as shown in the illustration.
HINT:
Press the No. 4 back door name plate firmly to install it.
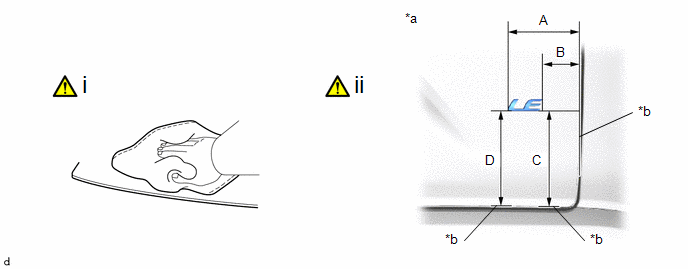
11. INSTALL NO. 4 BACK DOOR NAME PLATE (for Type B)
|
*a | Reference Values |
*b | End of R |
Standard Measurement:
|
Area | Measurement |
Area | Measurement |
|---|---|---|---|
|
A | 146.3 mm (5.760 in.) |
B | 51.2 mm (2.016 in.) |
|
C | 233 mm (9.173 in.) |
D | 230.3 mm (9.067 in.) |
(1) Clean the vehicle body surface.
1. Using a heat light, heat the vehicle body surface.
2. Remove any remaining double-sided tape from the vehicle body.
3. Wipe off any tape adhesive residue with cleaner.
NOTICE:
- Installing the No. 4 back door name plate with some double-sided tape remaining may cause poor adhesion. Perform this procedure until the tape is sufficiently removed.
- Make sure to use a cloth when removing. Using a screwdriver, etc., may cause damage and poor adhesion.
(2) Install a new No. 4 back door name plate.
1. Using a heat light, heat the vehicle body and No. 4 back door name plate.
2. Remove the release paper from the No. 4 back door name plate.
HINT:
After removing the release paper, keep the exposed adhesive free from foreign matter.
3. Install the No. 4 back door name plate as shown in the illustration.
HINT:
Press the No. 4 back door name plate firmly to install it.
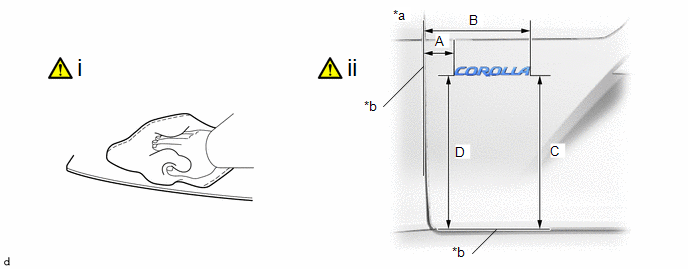
12. INSTALL NO. 4 BACK DOOR NAME PLATE (for Type C)
|
*a | Reference Values |
*b | End of R |
Standard Measurement:
|
Area | Measurement |
Area | Measurement |
|---|---|---|---|
|
A | 225.32 mm (8.871 in.) |
B | 226.12 mm (8.902 in.) |
|
C | 68.16 mm (2.683 in.) |
D | 22.8 mm (0.898 in.) |
(1) Clean the vehicle body surface.
1. Using a heat light, heat the vehicle body surface.
2. Remove any remaining double-sided tape from the vehicle body.
3. Wipe off any tape adhesive residue with cleaner.
NOTICE:
- Installing the No. 4 back door name plate with some double-sided tape remaining may cause poor adhesion. Perform this procedure until the tape is sufficiently removed.
- Make sure to use a cloth when removing. Using a screwdriver, etc., may cause damage and poor adhesion.
(2) Install a new No. 4 back door name plate.
1. Using a heat light, heat the vehicle body and No. 4 back door name plate.
2. Remove the release paper from the No. 4 back door name plate.
HINT:
After removing the release paper, keep the exposed adhesive free from foreign matter.
3. Install the No. 4 back door name plate as shown in the illustration.
HINT:
Press the No. 4 back door name plate firmly to install it.
13. INSTALL NO. 4 BACK DOOR NAME PLATE (for Type D)

|
*a | Reference Values |
*b | End of R |
Standard Measurement:
|
Area | Measurement |
Area | Measurement |
|---|---|---|---|
|
A | 225.12 mm (8.863 in.) |
B | 226.47 mm (8.916 in.) |
|
C | 50.57 mm (1.991 in.) |
D | 22.8 mm (0.898 in.) |
(1) Clean the vehicle body surface.
1. Using a heat light, heat the vehicle body surface.
2. Remove any remaining double-sided tape from the vehicle body.
3. Wipe off any tape adhesive residue with cleaner.
NOTICE:
- Installing the No. 4 back door name plate with some double-sided tape remaining may cause poor adhesion. Perform this procedure until the tape is sufficiently removed.
- Make sure to use a cloth when removing. Using a screwdriver, etc., may cause damage and poor adhesion.
(2) Install a new No. 4 back door name plate.
1. Using a heat light, heat the vehicle body and No. 4 back door name plate.
2. Remove the release paper from the No. 4 back door name plate.
HINT:
After removing the release paper, keep the exposed adhesive free from foreign matter.
3. Install the No. 4 back door name plate as shown in the illustration.
HINT:
Press the No. 4 back door name plate firmly to install it.


