Toyota Corolla Cross: Removal
REMOVAL
CAUTION / NOTICE / HINT
COMPONENTS (REMOVAL)
|
Procedure | Part Name Code |
.png) |
.png) |
 |
|---|---|---|---|---|---|
|
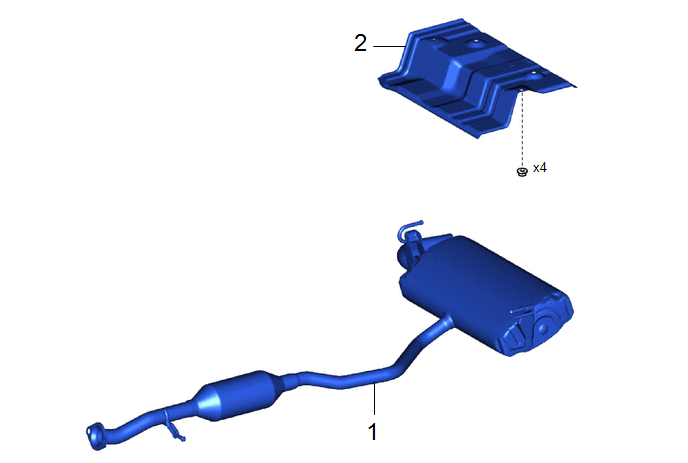
1 | TAIL EXHAUST PIPE ASSEMBLY |
17430 | - |
- | - |
|
2 | MAIN MUFFLER HEAT INSULATOR |
58327D | - |
- | - |

|
Procedure | Part Name Code |
.png) |
.png) |
 |
|---|---|---|---|---|---|
|
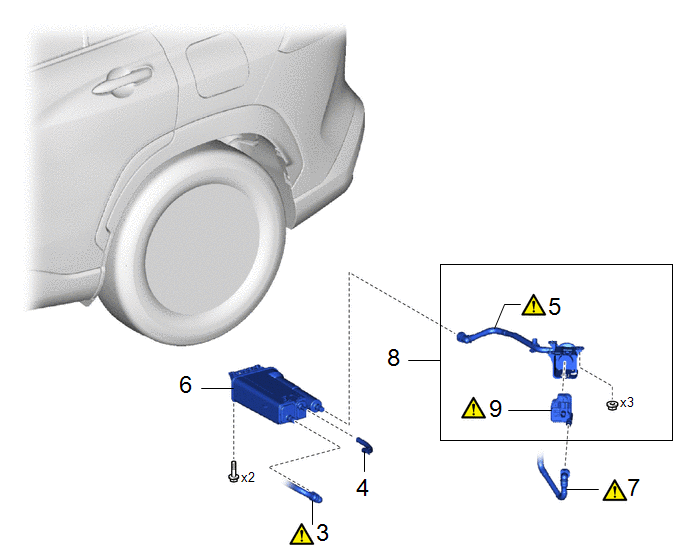
3 | FUEL TANK VENT HOSE SUB-ASSEMBLY |
77404A |
|
- | - |
|
4 | CHARCOAL CANISTER HOSE |
77759A | - |
- | - |
|
5 | DISCONNECT CHARCOAL WITH OUTLET HOSE CANISTER ASSEMBLY |
77730B |
|
- | - |
|
6 | CANISTER (CHARCOAL CANISTER ASSEMBLY) |
77740 | - |
- | - |
|
7 | FUEL TANK VENT HOSE |
77404 |
|
- | - |
|
8 | REMOVE CHARCOAL WITH OUTLET HOSE CANISTER ASSEMBLY |
77730B | - |
- | - |
|
9 | LEAK DETECTION PUMP SUB-ASSEMBLY |
- |
|
- | - |
CAUTION / NOTICE / HINT
The necessary procedures (adjustment, calibration, initialization or registration) that must be performed after parts are removed and installed, or replaced during the canister (charcoal canister assembly) removal/installation are shown below.
Necessary Procedures After Parts Removed/Installed/Replaced|
Replacement Part or Procedure |
Necessary Procedure | Effect/Inoperative when not Performed |
Link |
|---|---|---|---|
| Gas leaks from exhaust system is repaired |
Inspection After Repair |
|
|
PROCEDURE
1. REMOVE TAIL EXHAUST PIPE ASSEMBLY
Click here
.gif)
2. REMOVE MAIN MUFFLER HEAT INSULATOR

3. DISCONNECT FUEL TANK VENT HOSE SUB-ASSEMBLY

(1) Disconnect the fuel tank vent hose sub-assembly the canister (charcoal canister assembly).
Click here .gif)
4. DISCONNECT CHARCOAL CANISTER HOSE

5. DISCONNECT CHARCOAL WITH OUTLET HOSE CANISTER ASSEMBLY

(1) Disconnect the charcoal with outlet hose canister assembly from the canister (charcoal canister assembly).
Click here .gif)
6. REMOVE CANISTER (CHARCOAL CANISTER ASSEMBLY)

7. DISCONNECT FUEL TANK VENT HOSE

(1) Disconnect the fuel tank vent hose sub-assembly from the No. 2 charcoal canister filter.
Click here .gif)
8. REMOVE CHARCOAL WITH OUTLET HOSE CANISTER ASSEMBLY
.png)
9. REMOVE LEAK DETECTION PUMP SUB-ASSEMBLY
.png) |
HINT: Only perform this procedure when replacement of the leak detection pump sub-assembly is necessary. |

|
*a | Protective Tape |
- | - |
|
*1 | No. 2 charcoal canister filter |
- | - |
(1) Before removing the leak detection pump sub-assembly, clean the No. 1 charcoal canister filter by blowing air into it to ensure that the No. 1 charcoal canister filter is free of foreign matter.
NOTICE:
- Make sure to clean the charcoal canister sub-assembly using air only.
- Do not use gasoline, thinners or solvents.
(2) While disengaging the 2 claws as shown in the illustration, push the leak detection pump subassembly upwards using a screwdriver with its tip wrapped with protective tape to remove it.
(3) Check if the No. 2 charcoal canister filter contains foreign matter such as mud or water.
- Visually check that the inside of the No. 2 charcoal canister filter is free of foreign matter.
- Hold the No. 2 charcoal canister filter upside down to make sure that it is free of foreign matter.
- If the No. 2 charcoal canister filter contains foreign matter, replace the No. 1 charcoal canister filter.


