Toyota Corolla Cross: Reassembly
REASSEMBLY
CAUTION / NOTICE / HINT
COMPONENTS (REASSEMBLY)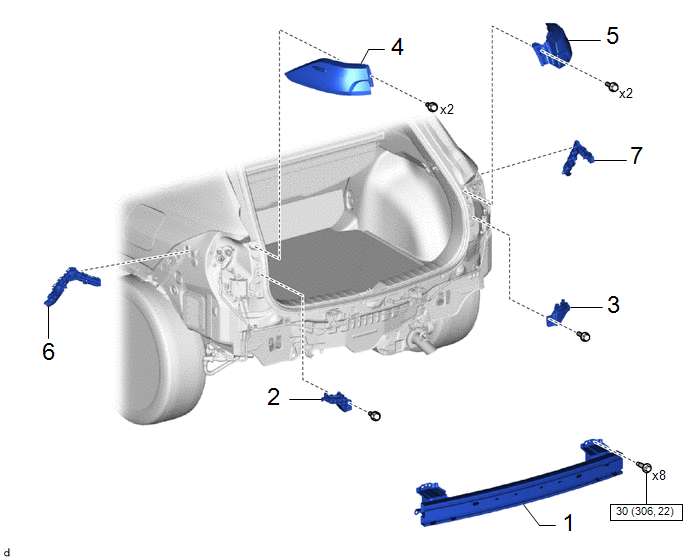
|
Procedure | Part Name Code |
.png) |
.png) |
 |
|---|---|---|---|---|---|
|
1 | REAR BUMPER REINFORCEMENT SUB-ASSEMBLY |
52023 | - |
- | - |
|
2 | REAR BUMPER UPPER RETAINER LH |
52563A | - |
- | - |
|
3 | REAR BUMPER UPPER RETAINER RH |
52562B | - |
- | - |
|
4 | REAR COMBINATION LIGHT ASSEMBLY LH |
81560 | - |
- | - |
|
5 | REAR COMBINATION LIGHT ASSEMBLY RH |
81550 | - |
- | - |
|
6 | REAR BUMPER SIDE RETAINER LH |
52576 | - |
- | - |
|
7 | REAR BUMPER SIDE RETAINER RH |
52575 | - |
- | - |
.png) |
N*m (kgf*cm, ft.*lbf): Specified torque |
- | - |
|
Procedure | Part Name Code |
|
|
| |
|---|---|---|---|---|---|
|
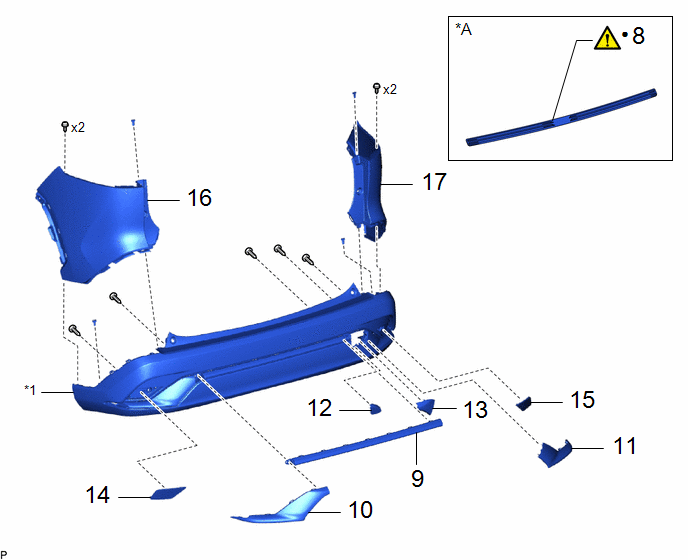
8 | REAR BUMPER PROTECTOR |
52581 |
|
- | - |
|
9 | REAR BUMPER BAR |
52151E | - |
- | - |
|
10 | REAR BUMPER SIDE MOULDING LH |
52753 | - |
- | - |
|
11 | REAR BUMPER SIDE MOULDING RH |
52752 | - |
- | - |
|
12 | NO. 1 REAR BUMPER PLATE |
52162B | - |
- | - |
|
13 | REAR BUMPER PLATE RH |
52163A | - |
- | - |
|
14 | REFLEX REFLECTOR ASSEMBLY LH |
81920 | - |
- | - |
|
15 | REFLEX REFLECTOR ASSEMBLY RH |
81910 | - |
- | - |
|
16 | REAR BUMPER UPPER COVER LH |
52166A | - |
- | - |
|
17 | REAR BUMPER UPPER COVER RH |
52165A | - |
- | - |
.gif)
|
*1 | REAR BUMPER COVER |
- | - |
|
*A | w/ Protector |
- | - |
|
● | Non-reusable part |
- | - |
|
Procedure | Part Name Code |
|
|
| |
|---|---|---|---|---|---|
|
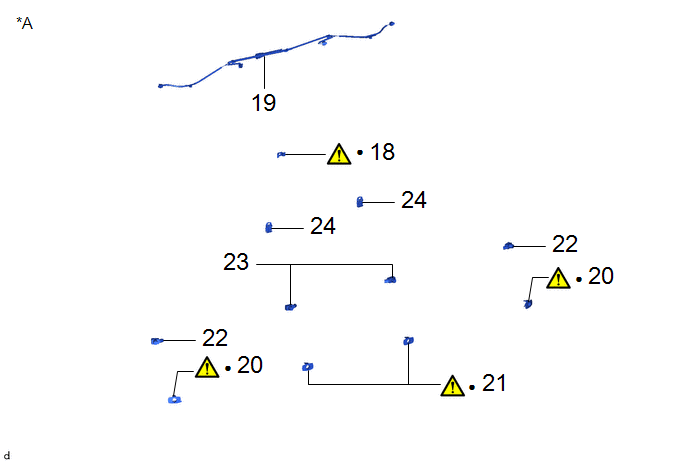
18 | REAR ULTRASONIC SENSOR CLIP |
89348Y |
|
- | - |
|
19 | NO. 9 FLOOR WIRE |
8216C | - |
- | - |
|
20 | REAR CORNER ULTRASONIC SENSOR RETAINER |
89C48A |
|
- | - |
|
21 | REAR CENTER ULTRASONIC SENSOR RETAINER |
89C48B |
|
- | - |
|
22 | REAR CORNER ULTRASONIC SENSOR |
89342 | - |
- | - |
|
23 | REAR CENTER ULTRASONIC SENSOR |
89342A | - |
- | - |
|
24 | ULTRASONIC SENSOR CLIP |
89348D | - |
- | - |
|
*A | w/ TOYOTA Parking Assist-sensor System |
- | - |
|
● | Non-reusable part |
- | - |
PROCEDURE
1. INSTALL REAR BUMPER REINFORCEMENT SUB-ASSEMBLY
Torque:
30 N·m {306 kgf·cm, 22 ft·lbf}
2. INSTALL REAR BUMPER UPPER RETAINER LH
3. INSTALL REAR BUMPER UPPER RETAINER RH
4. INSTALL REAR COMBINATION LIGHT ASSEMBLY LH
5. INSTALL REAR COMBINATION LIGHT ASSEMBLY RH
6. INSTALL REAR BUMPER SIDE RETAINER LH
7. INSTALL REAR BUMPER SIDE RETAINER RH
8. INSTALL REAR BUMPER BAR
9. INSTALL REAR BUMPER PROTECTOR
|
|
NOTICE: When installing the a new rear bumper protector, heat the rear bumper cover heat light. |
|
Item | Temperature |
|---|---|
|
Rear Bumper Cover | 20 to 30°C (68 to 86°F) |
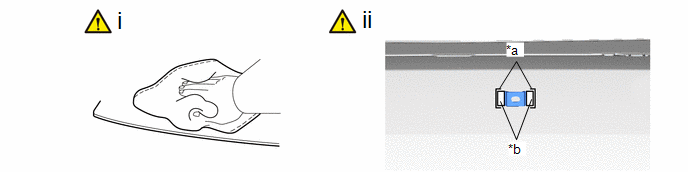
CAUTION:
- Do not touch the heat light and heated parts, touching the heat light may result in burns.
- Touching heated parts for a long time may result in burns.
.png)
|
*a | Heated Part |
|
*b | Heat Light |
NOTICE:
Do not heat the rear bumper cover excessively.
|
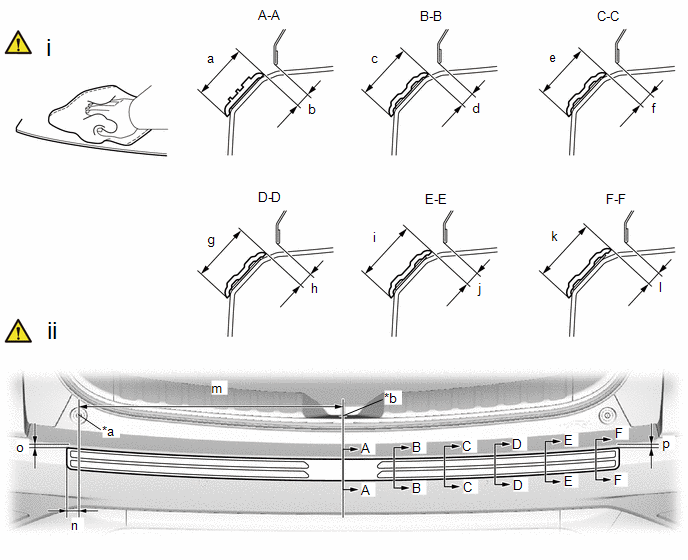
*a | Center of Hole |
*b | Center of Vehicle Body |
Standard Measurement:
|
Area | Measurement |
Area | Measurement |
|---|---|---|---|
|
a | 36.3 mm (1.429 in.) |
b | 10.0 mm (0.394 in.) |
|
c | 36.5 mm (1.437 in.) |
d | 10.0 mm (0.394 in.) |
|
e | 37.1 mm (1.461 in.) |
f | 10.0 mm (0.394 in.) |
|
g | 38.1 mm (1.500 in.) |
h | 10.0 mm (0.394 in.) |
|
i | 39.3 mm (1.547 in.) |
j | 10.0 mm (0.394 in.) |
|
k | 40.2 mm (1.583 in.) |
l | 10.0 mm (0.394 in.) |
|
m | 518.5 mm (20.413 in.) |
n | 21.6 to 26.6 mm (0.850 to 1.047 in.) |
|
o | 3.9 to 6.9 mm (0.154 to 0.272 in.) |
p | 3.9 to 6.9 mm (0.154 to 0.272 in.) |
(1) Clean the surface of the rear bumper assembly.
1. Using a heat light, heat the rear bumper assembly surface.
2. Remove any remaining double-sided tape from the rear bumper assembly.
3. Wipe off any tape adhesive residue with cleaner.
CAUTION:
- Installing the rear bumper protector with some double-sided tape remaining may cause poor adhesion. Perform this procedure until the tape is sufficiently removed.
- Make sure to use a cloth when removing. Using a screwdriver, etc., may cause damage and poor adhesion.
(2) Install a new rear bumper protector as shown in the illustration.
1. Using a heat light, heat the rear bumper cover surface.
2. Remove the release paper from the rear bumper protector.
HINT:
After removing the release paper, keep the exposed adhesive free from foreign matter.
3. Install the rear bumper protector as shown in the illustration.
HINT:
- Install the rear bumper protector along the location line on the rear bumper assembly.
- Press the rear bumper protector firmly to install it.
10. INSTALL REAR BUMPER SIDE MOULDING LH
11. INSTALL REAR BUMPER SIDE MOULDING RH
12. INSTALL NO. 1 REAR BUMPER PLATE
13. INSTALL REAR BUMPER PLATE RH
14. INSTALL REFLEX REFLECTOR ASSEMBLY LH
15. INSTALL REFLEX REFLECTOR ASSEMBLY RH
16. INSTALL REAR BUMPER UPPER COVER LH
17. INSTALL REAR BUMPER UPPER COVER RH
18. INSTALL REAR ULTRASONIC SENSOR CLIP (w/ TOYOTA Parking Assist-sensor System)
|
|
NOTICE: When installing the a new rear ultrasonic sensor clip, heat the rear bumper cover heat light. |
|
Item | Temperature |
|---|---|
|
Rear Bumper Cover | 20 to 30°C (68 to 86°F) |
CAUTION:
- Do not touch the heat light and heated parts, touching the heat light may result in burns.
- Touching heated parts for a long time may result in burns.
|
*a | Heated Part |
|
*b | Heat Light |
NOTICE:
Do not heat the rear bumper cover excessively.
|
*a | Location Line |
*b | Double-sided Tape |
(1) Clean the rear bumper cover surface by the below procedure.
1. Using a heat light, heat the rear bumper cover surface.
2. Remove any remaining double-sided tape from the rear bumper cover.
3. Wipe off any tape adhesive residue with cleaner.
NOTICE:
- Installing the rear ultrasonic sensor clip with some double-sided tape remaining may cause poor adhesion. Perform this procedure until the tape is sufficiently removed.
- Make sure to use a cloth when removing. Using a screwdriver, etc., may cause damage and poor adhesion.
(2) Install a new rear ultrasonic sensor clip by the below procedure.
1. Using a heat light, heat the rear bumper cover surface.
2. Remove the release paper from the rear ultrasonic sensor clip.
HINT:
After removing the release paper, keep the exposed adhesive free from foreign matter.
3. Install the rear ultrasonic sensor clip as shown in the illustration.
HINT:
- Install the rear ultrasonic sensor clip along the location line on the rear bumper assembly.
- Press the rear ultrasonic sensor clip firmly to install it.
19. INSTALL NO. 9 FLOOR WIRE (w/ TOYOTA Parking Assist-sensor System)
20. INSTALL REAR CORNER ULTRASONIC SENSOR RETAINER (w/ TOYOTA Parking Assist-sensor System)
|
|
Click here |
21. INSTALL REAR CENTER ULTRASONIC SENSOR RETAINER (w/ TOYOTA Parking Assist-sensor System)
|
|
Click here |
22. INSTALL REAR CORNER ULTRASONIC SENSOR (w/ TOYOTA Parking Assist-sensor System)
23. INSTALL REAR CENTER ULTRASONIC SENSOR (w/ TOYOTA Parking Assist-sensor System)
24. INSTALL ULTRASONIC SENSOR CLIP (w/ TOYOTA Parking Assist-sensor System)


