Toyota Corolla Cross: Light bulbs
You may replace the following bulbs yourself. The difficulty level of replacement varies depending on the bulb. If necessary bulb replacement seems difficult to perform, contact your Toyota dealer.
For more information about replacing other light bulbs, contact your Toyota dealer.
Preparing for light bulb replacement
Check the wattage of the light bulb to be replaced.
Bulb locations
■ Front

- Front side marker lights (bulb type)
- Parking lights (bulb type)
- Front turn signal lights (bulb type)
■ Rear

- Tail lights/rear side marker lights (bulb type)
- Back-up lights
- License plate lights
■ Lights that need to be replaced by your Toyota dealer
- Headlights (if equipped)
- Headlights/daytime running lights (if equipped)
- Daytime running lights/parking lights (if equipped)
- Front turn signal lights (LED type)
- Front side marker lights (LED type)
- Fog lights (if equipped)
- Side turn signal lights (if equipped)
- Tail lights (if equipped)
- Stop lights
- Rear turn signal lights
■LED light bulbs
The lights other than the following lights each consist of a number of LEDs. If any of the LEDs burn out, take your vehicle to your Toyota dealer to have the light replaced.
- Front side marker lights (bulb type)
- Parking lights (bulb type)
- Front turn signal lights (bulb type)
- Tail lights/rear side marker lights (bulb type)
- Back-up lights
- License plate lights
■Condensation build-up on the inside of the lens
Temporary condensation build-up on the inside of the headlight lens does not indicate a malfunction.
Contact your Toyota dealer for more information in the following situations:
- Large drops of water have built up on the inside of the lens.
- Water has built up inside the headlight.
Replacing light bulbs
■ Front side marker lights (bulb type)
1. Turn the bulb base counterclockwise.

2. Remove the light bulb.

3. When installing, reverse the steps listed.
■ Parking lights (bulb type)
1. Turn the bulb base counterclockwise.

2. Remove the light bulb.

3. When installing, reverse the steps listed.
■ Front turn signal lights (bulb type)
1. Turn the bulb base counterclockwise.

2. Remove the light bulb.

3. When installing, reverse the steps listed.
■ Tail lights/rear side marker lights (bulb type)
1. Open the back door.
2. Remove the 2 screws and then remove the light unit by pulling it straight back.

3. Turn the bulb base counterclockwise.

4. Remove the light bulb.

5. When installing the light bulb, install it by conducting steps 4 and 3 with the directions reversed.
6. Install the light unit.
Align the 2 guides and push the light unit toward the front of the vehicle to install it.

7. Install the 2 screws.

■ Back-up lights
1. Open the back door and remove the cover.
Using a flathead screwdriver, remove the cover.
To prevent damage to the vehicle, wrap the tip of the flathead screwdriver with tape, etc.

2. Turn the bulb base counterclockwise and remove it.

3. Remove the light bulb.

4. When installing the light bulb, install it by conducting steps 3 and 2 with the directions reversed.
5. Install the cover.
Align the tabs of the cover with the grooves and install the cover.

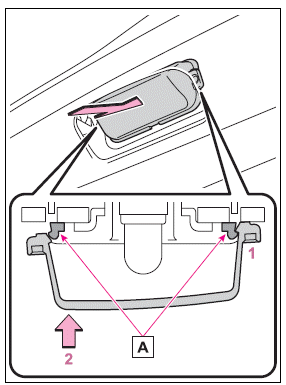
■ License plate lights
1. Remove the lens.

- Lens
- Hook
- Insert a small flathead screwdriver, etc. into either the right or left hole of the lens.
- Push the screwdriver sideways in the direction of the arrow shown in the illustration, disengage the hook, and then remove the lens.
To prevent damage to the vehicle, wrap the tip of the screwdriver with tape, etc.
2. Remove the light bulb.

3. Install a new light bulb.

4. Install the lens.
- Hooks
- Fit the lens into either the right or left hooks.
- Push the lens into place.
After installation, confirm that the lens is properly installed by gently pulling it.
WARNING
■To prevent injury
Before performing any light bulb replacement procedure, be sure to turn the engine switch off. Failure to do so may result in burns from hot components or a part of your body may get caught on an operating component, possibly causing serious injury.
■Replacing light bulbs
- Turn off the lights. Do not attempt to replace the bulb immediately after turning off the lights. The bulbs become very hot and may cause burns.
- Do not touch the glass portion of the light bulb with bare hands. When it is unavoidable to hold the glass portion, use and hold with a clean dry cloth to avoid getting moisture and oils on the bulb. Also, if the bulb is scratched or dropped, it may blow out or crack.
- Fully install light bulbs and any parts used to secure them. Failure to do so may result in heat damage, fire, or water entering the light unit. This may damage the lights or cause condensation to build up on the lens.
■To prevent damage or fire
- Make sure bulbs are fully seated and locked.
- Check the wattage of the bulb before installing to prevent heat damage.


