Toyota Corolla Cross: Installation
INSTALLATION
CAUTION / NOTICE / HINT
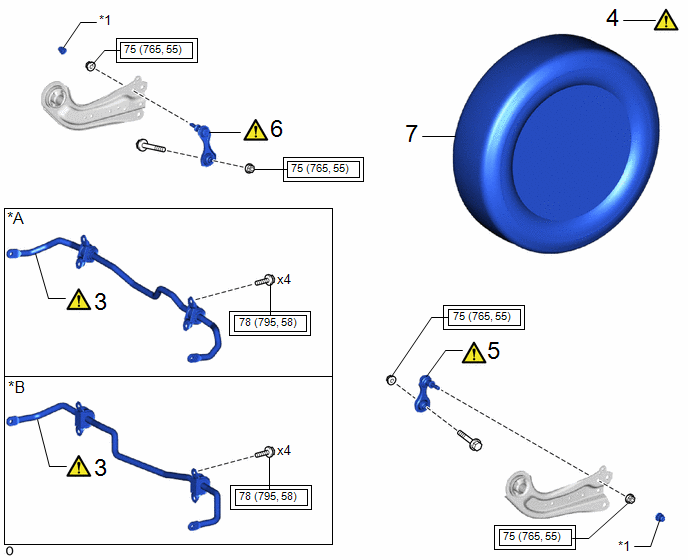
COMPONENTS (INSTALLATION)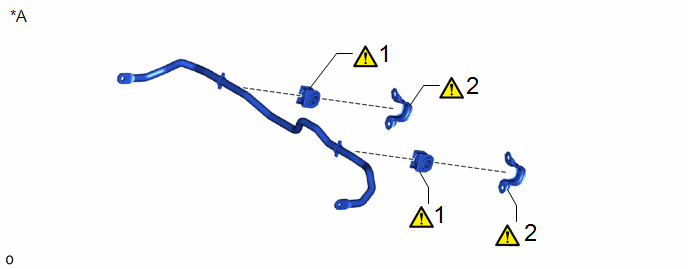
|
Procedure |
Part Name Code |
.png) |
.png) |
.png) |
|
|---|---|---|---|---|---|
|
1 |
REAR STABILIZER BAR BUSH |
48818 |
|
- |
- |
|
2 |
REAR NO. 1 STABILIZER BAR BRACKET |
48832A |
|
- |
- |
|
*A |
for Gasoline Model |
- |
- |
|
Procedure |
Part Name Code |
|
|
|
|
|---|---|---|---|---|---|
|
3 |
REAR STABILIZER BAR |
48812 |
|
- |
- |
|
4 |
STABILIZE SUSPENSION |
- |
|
- |
- |
|
5 |
REAR STABILIZER LINK ASSEMBLY LH |
48840A |
|
- |
- |
|
6 |
REAR STABILIZER LINK ASSEMBLY RH |
48830D |
|
- |
- |
|
7 |
REAR WHEEL |
- |
- |
- |
- |
|
*A |
for Gasoline Model |
*B |
for HEV Model |
|
*1 |
CAP |
- |
- |
.png) |
Tightening torque for "Major areas involving basic vehicle performance such as moving/turning/stopping" : N*m (kgf*cm, ft.*lbf) |
- |
- |
PROCEDURE
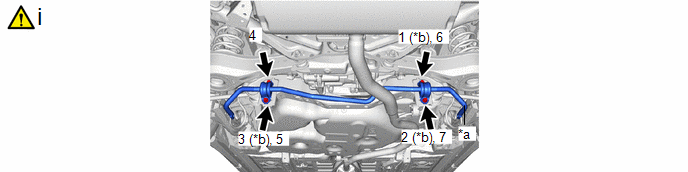
1. INSTALL REAR STABILIZER BAR BUSH (for Gasoline Model)
|
|
NOTICE: Be sure to install the rear stabilizer bushings so that each cutout faces the front of the vehicle. |
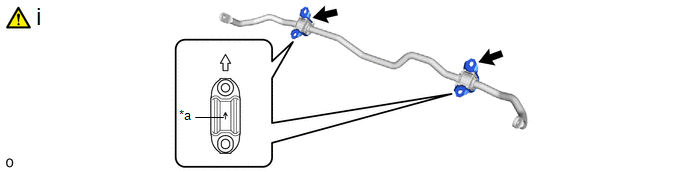
2. INSTALL REAR NO. 1 STABILIZER BAR BRACKET (for Gasoline Model)
|
*a |
Arrow Mark |
- |
- |
.png) |
Top of the Vehicle |
- |
- |
(1) Install the 2 rear No. 1 stabilizer bar brackets to the 2 rear stabilizer bushings.
NOTICE:
Be sure to install the rear No. 1 stabilizer bar brackets so that each arrow mark faces the top of the vehicle.
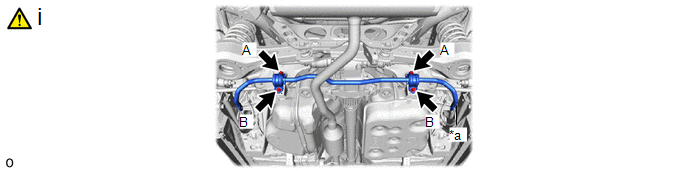
3. INSTALL REAR STABILIZER BAR
(a) for Gasoline Model:
|
*a |
Identification Mark |
- |
- |
(1) Install the rear stabilizer bar to the rear suspension member sub-assembly with the 4 bolts.
Torque:
78 N·m {795 kgf·cm, 58 ft·lbf}
NOTICE:
- Ensure that the identification mark faces the right side of the vehicle.
- Temporarily tighten bolt (A) and then fully tighten the 2 bolts in the order of (B) and (A).
(b) for HEV Model:
|
*a |
Identification Mark |
*b |
Temporarily Tighten |
(1) Install the rear stabilizer bar to the rear suspension member sub-assembly with the 4 bolts in the order shown in the illustration.
Torque:
78 N·m {795 kgf·cm, 58 ft·lbf}
NOTICE:
Ensure that the identification mark faces the right side of the vehicle.
4. STABILIZE SUSPENSION
Click here .gif)
5. INSTALL REAR STABILIZER LINK ASSEMBLY LH
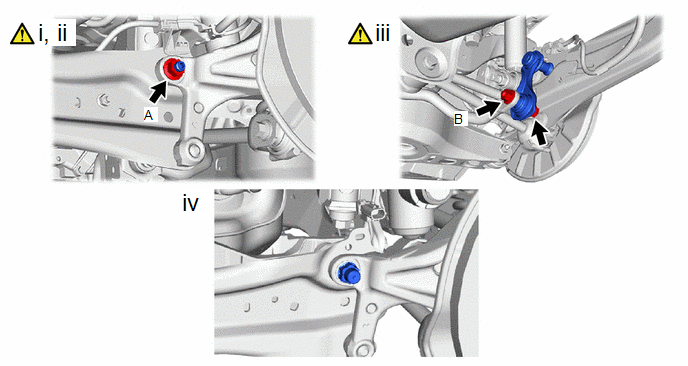
(1) Install the rear stabilizer link assembly LH with the nut (A).
Torque:
75 N·m {765 kgf·cm, 55 ft·lbf}
(2) If the ball joint turns together with the nut, use a 6 mm hexagon socket wrench to hold the stud bolt.
(3) Install the rear stabilizer link assembly LH with the bolt and nut (B).
Torque:
75 N·m {765 kgf·cm, 55 ft·lbf}
NOTICE:
Tighten the nut with the bolt secured.
(4) Install the cap.
6. INSTALL REAR STABILIZER LINK ASSEMBLY RH
7. INSTALL REAR WHEEL
Click here


