Toyota Corolla Cross: Installation
INSTALLATION
CAUTION / NOTICE / HINT
COMPONENTS (INSTALLATION)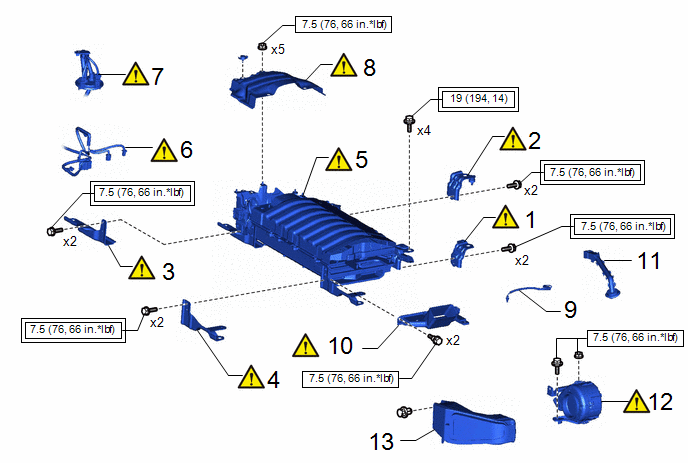
|
Procedure | Part Name Code |
.png) |
.png) |
 |
|---|---|---|---|---|---|
|
1 | NO. 4 HV BATTERY CARRIER BRACKET |
G92K6 |
|
- | - |
|
2 | NO. 3 HV BATTERY CARRIER BRACKET |
G92K5 |
|
- | - |
|
3 | NO. 2 HYBRID BATTERY CARRIER BRACKET |
G92K4 |
|
- | - |
|
4 | NO. 1 HV BATTERY CARRIER BRACKET SUB-ASSEMBLY |
G920B |
|
- | - |
|
5 | HV SUPPLY BATTERY ASSEMBLY |
G9510 |
|
- | - |
|
6 | FLOOR WIRE |
82161 |
|
- | - |
|
7 | FLOOR UNDER WIRE |
821H1 |
|
- | - |
|
8 | NO. 1 HYBRID BATTERY SHIELD SUB-ASSEMBLY |
G920Q |
|
- | - |
|
9 | NO. 3 HV BATTERY PACK WIRE |
G92X3 | - |
- | - |
|
10 | NO. 2 HYBRID BATTERY INTAKE DUCT |
G92D2 |
|
- | - |
|
11 | HYBRID BATTERY HOSE ASSEMBLY |
G9290A | - |
- | - |
|
12 | BATTERY COOLING BLOWER ASSEMBLY |
G9230 |
|
- | - |
|
13 | NO. 1 EV BATTERY INTAKE DUCT |
G92D1A | - |
- | - |
.png) |
Tightening torque for "Major areas involving basic vehicle performance such as moving/turning/stopping" : N*m (kgf*cm, ft.*lbf) |
.png) |
N*m (kgf*cm, ft.*lbf): Specified torque |
|
Procedure | Part Name Code |
|
|
| |
|---|---|---|---|---|---|
|
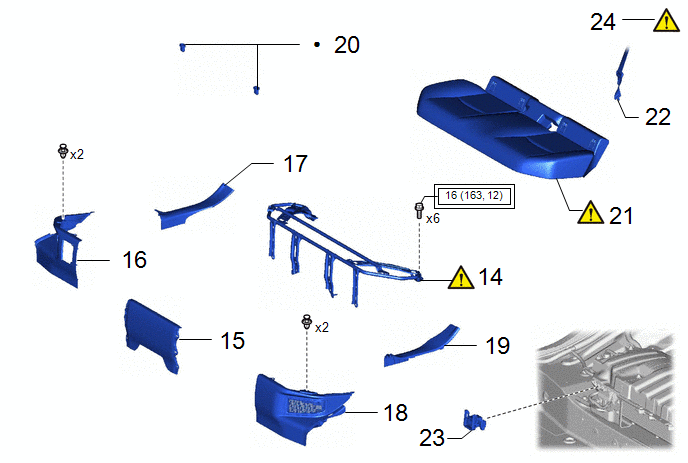
14 | REAR SEAT CUSHION LEG SUB-ASSEMBLY |
71033 |
|
- | - |
|
15 | REAR UNDER COVER |
76971G | - |
- | - |
|
16 | REAR UNDER SIDE COVER RH |
76973F | - |
- | - |
|
17 | REAR DOOR SCUFF PLATE RH |
67917A | - |
- | - |
|
18 | REAR UNDER SIDE COVER LH |
76974F | - |
- | - |
|
19 | REAR DOOR SCUFF PLATE LH |
67918A | - |
- | - |
|
20 | REAR SEAT CUSHION LOCK HOOK |
72693 | - |
- | - |
|
21 | BENCH TYPE REAR SEAT CUSHION ASSEMBLY |
- |
|
- | - |
|
22 | REAR CENTER SEAT OUTER BELT ASSEMBLY |
73350C | - |
- | - |
|
23 | SERVICE PLUG GRIP |
G3834 | - |
- | - |
|
24 | UTILITY |
- |
|
- | - |
|
|
Tightening torque for "Major areas involving basic vehicle performance such as moving/turning/stopping" : N*m (kgf*cm, ft.*lbf) |
● | Non-reusable part |
PROCEDURE
1. INSTALL NO. 4 HV BATTERY CARRIER BRACKET
|
|
CAUTION: Wear insulated gloves. |
Torque:
7.5 N·m {76 kgf·cm, 66 in·lbf}
2. INSTALL NO. 3 HV BATTERY CARRIER BRACKET
|
|
CAUTION: Wear insulated gloves. |
Torque:
7.5 N·m {76 kgf·cm, 66 in·lbf}
3. INSTALL NO. 2 HYBRID BATTERY CARRIER BRACKET
|
|
CAUTION: Wear insulated gloves. |
Torque:
7.5 N·m {76 kgf·cm, 66 in·lbf}
4. INSTALL NO. 1 HV BATTERY CARRIER BRACKET SUB-ASSEMBLY
|
|
CAUTION: Wear insulated gloves. |
Torque:
7.5 N·m {76 kgf·cm, 66 in·lbf}
5. INSTALL HV SUPPLY BATTERY ASSEMBLY
|
|
CAUTION: Wear insulated gloves. NOTICE:
|
Torque:
19 N·m {194 kgf·cm, 14 ft·lbf}
6. CONNECT FLOOR WIRE
|
|
CAUTION: Wear insulated gloves. |
7. CONNECT FLOOR UNDER WIRE
|
|
CAUTION: Wear insulated gloves. NOTICE: Make sure that the connectors are connected securely. |
8. INSTALL NO. 1 HYBRID BATTERY SHIELD SUB-ASSEMBLY
9. INSTALL NO. 3 HV BATTERY PACK WIRE
10. INSTALL NO. 2 HYBRID BATTERY INTAKE DUCT
|
|
CAUTION: Wear insulated gloves. |
Torque:
7.5 N·m {76 kgf·cm, 66 in·lbf}
11. INSTALL HYBRID BATTERY HOSE ASSEMBLY
12. INSTALL BATTERY COOLING BLOWER ASSEMBLY
|
|
Click here |
13. INSTALL NO. 1 EV BATTERY INTAKE DUCT
Click here
.gif)
14. INSTALL REAR SEAT CUSHION LEG SUB-ASSEMBLY

(1) Temporarily install the rear seat cushion leg sub-assembly with the 6 bolts.
(2) Fully tighten the 6 bolts in the order shown in the illustration.
Torque:
16 N·m {163 kgf·cm, 12 ft·lbf}
15. INSTALL REAR UNDER COVER
16. INSTALL REAR UNDER SIDE COVER RH
17. INSTALL REAR DOOR SCUFF PLATE RH
Click here
18. INSTALL REAR UNDER SIDE COVER LH
19. INSTALL REAR DOOR SCUFF PLATE LH
(a) Use the same procedure as for the RH side.
20. INSTALL REAR SEAT CUSHION LOCK HOOK
Click here
21. INSTALL BENCH TYPE REAR SEAT CUSHION ASSEMBLY
Click here
22. CONNECT REAR CENTER SEAT OUTER BELT ASSEMBLY
Click here
23. INSTALL SERVICE PLUG GRIP
Click here
24. PERFORM UTILITY
NOTICE:
- Perform "Battery Status Info Update" after replacing the malfunctioning HV battery.
Click here
- Perform "Prediagnostic Battery Charge" after replacing the malfunctioning HV battery.
Click here
- Perform "Battery Diagnosis" after replacing the malfunctioning HV battery.
Click here


