Toyota Corolla Cross: Adjustment
ADJUSTMENT
PROCEDURE
1. SECURE VEHICLE
(a) Fully apply the parking brake and chock a wheel.
CAUTION:
- Make sure to apply the parking brake and chock a wheel before performing this procedure.
- If the vehicle is not secure and the shift lever is moved to N, the vehicle may suddenly move, possibly resulting in an accident or serious injury.
.png)
2. INSPECT SHIFT LEVER POSITION SENSOR POSITION
(a) Turn the ignition switch to ON (READY).
(b) Move the shift lever to D and release the brake pedal.
CAUTION:
Be sure to apply the parking brake and chock all 4 wheels to secure the vehicle.
|
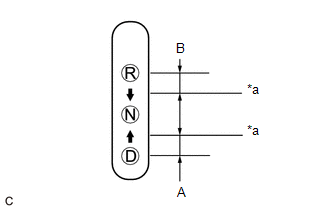
(c) Slowly move the shift lever to N and measure the moving distance (A) of the shift lever from the original point to the gear disengagement point. NOTICE: Be sure to move the shift lever slowly. |
|
(d) Move the shift lever to R and release the brake.
CAUTION:
Be sure to apply the parking brake and chock all 4 wheels to secure the vehicle.
(e) Slowly move the shift lever to N and measure the moving distance (B) of the shift lever from the original point to the gear disengagement point.
NOTICE:
Be sure to move the shift lever slowly.
(f) Check that the moving distances (A) and (B) shown in the illustration are almost the same.
HINT:
- If the moving distances (A) and (B) are almost the same, adjustment of the shift lever position is not necessary.
- If the moving distance (A) is shorter than (B), perform step [#1] of Adjust Shift Lever Position Sensor Position.
- If the moving distance (B) is shorter than (A), perform step [#2] of Adjust Shift Lever Position Sensor Position.
3. ADJUST SHIFT LEVER POSITION SENSOR POSITION
(a) If the moving distance (A) is shorter than (B). [#1]
HINT:
If the shift lever is moved from R to N, the moving distance of the shift lever from the original point to the gear disengagement point becomes longer.
(1) Move the shift lever to N.
|
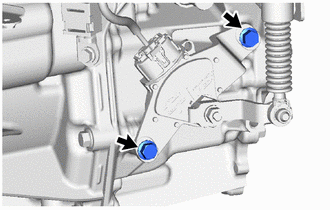
(2) Loosen the 2 bolts. NOTICE:
|
|
|
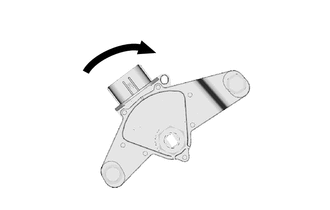
(3) Slightly turn the shift lever position sensor clockwise. |
|
|
(4) Tighten the 2 bolts. Torque: 11 N·m {112 kgf·cm, 8 ft·lbf} |
|
(5) Check the shift lever position sensor position.
(b) If the moving distance (B) is shorter than (A). [#2]
HINT:
If the shift lever is moved from D to N, the moving distance of the shift lever from the original point to the gear disengagement point becomes longer.
(1) Move the shift lever to N.
|
(2) Loosen the 2 bolts. NOTICE:
|
|
|
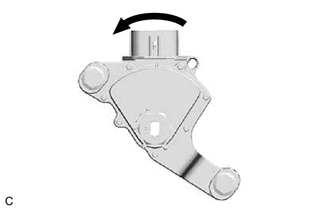
(3) Slightly turn the shift lever position sensor counterclockwise. |
|
|
(4) Tighten the 2 bolts. Torque: 11 N·m {112 kgf·cm, 8 ft·lbf} |
|
(5) Check the shift lever position sensor position.


