Toyota Corolla Cross: Removal
REMOVAL
CAUTION / NOTICE / HINT
COMPONENTS (REMOVAL)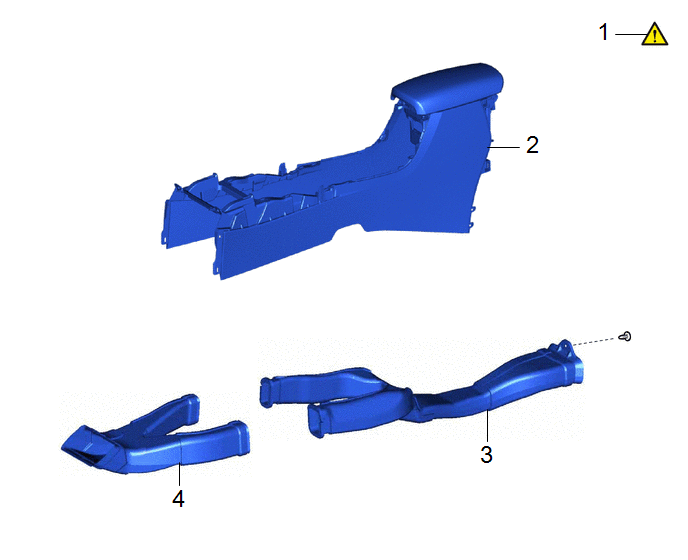
|
Procedure |
Part Name Code |
.png) |
.png) |
.png) |
|
|---|---|---|---|---|---|
|
1 |
SECURE VEHICLE |
- |
|
- |
- |
|
2 |
CONSOLE BOX ASSEMBLY |
58810J |
- |
- |
- |
|
3 |
NO. 2 CONSOLE BOX DUCT |
58862B |
- |
- |
- |
|
4 |
NO. 1 CONSOLE BOX DUCT |
58861B |
- |
- |
- |

|
Procedure |
Part Name Code |
|
|
|
|
|---|---|---|---|---|---|
|
5 |
NO. 1 ENGINE UNDER COVER ASSEMBLY |
51410 |
- |
- |
- |
|
6 |
TAIL EXHAUST PIPE ASSEMBLY |
17430 |
|
- |
- |
|
7 |
FRONT FLOOR CENTER BRACE |
57533B |
- |
- |
- |
|
8 |
NO. 2 AIR FUEL RATIO SENSOR |
89467C |
- |
- |
- |
|
9 |
FRONT EXHAUST PIPE ASSEMBLY |
17410 |
|
- |
- |
|
10 |
FRONT NO. 1 FLOOR HEAT INSULATOR |
58151 |
- |
- |
- |
|
● |
Non-reusable part |
- |
- |
|
Procedure |
Part Name Code |
|
|
|
|
|---|---|---|---|---|---|
|
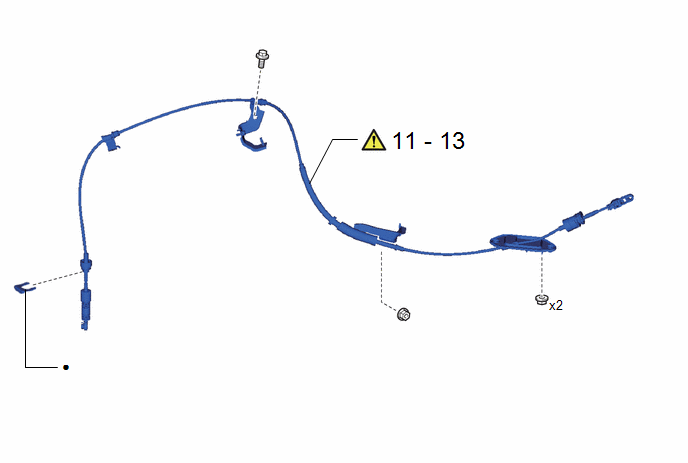
11 |
DISCONNECT TRANSMISSION CONTROL CABLE ASSEMBLY (Shift Lever Side) |
33820B |
|
- |
- |
|
12 |
DISCONNECT TRANSMISSION CONTROL CABLE ASSEMBLY (Transaxle Side) |
33820B |
|
- |
- |
|
13 |
TRANSMISSION CONTROL CABLE ASSEMBLY |
33820B |
|
- |
- |
|
● |
Non-reusable part |
- |
- |
CAUTION / NOTICE / HINT
The necessary procedures (adjustment, calibration, initialization or registration) that must be performed after parts are removed and installed, or replaced during transmission control cable assembly removal/installation are shown below.
Necessary Procedures After Parts Removed/Installed/Replaced|
Replaced Part or Performed Procedure |
Necessary Procedure |
Effect/Inoperative Function when Necessary Procedure not Performed |
Link |
|---|---|---|---|
|
Gas leak from exhaust system is repaired |
Inspection After Repair |
|
|
CAUTION:
To prevent burns, do not touch the engine, exhaust pipe or other high temperature components while the engine is hot.
.png)
PROCEDURE
1. SECURE VEHICLE
.png)
(1) Fully apply the parking brake and chock a wheel.
CAUTION:
- Make sure to apply the parking brake and chock a wheel before performing this procedure.
- If the vehicle is not secure and the shift lever is moved to N, the vehicle may suddenly move, possibly resulting in an accident or serious injury.
2. REMOVE CONSOLE BOX ASSEMBLY
Click here .gif)
3. REMOVE NO. 2 CONSOLE BOX DUCT
Click here
4. REMOVE NO. 1 CONSOLE BOX DUCT
Click here
5. REMOVE NO. 1 ENGINE UNDER COVER ASSEMBLY
Click here
6. REMOVE TAIL EXHAUST PIPE ASSEMBLY
|
|
Click here |
7. REMOVE FRONT FLOOR CENTER BRACE
Click here
8. REMOVE NO. 2 AIR FUEL RATIO SENSOR
Click here
9. REMOVE FRONT EXHAUST PIPE ASSEMBLY
|
|
Click here |
10. REMOVE FRONT NO. 1 FLOOR HEAT INSULATOR

11. DISCONNECT TRANSMISSION CONTROL CABLE ASSEMBLY (Shift Lever Side)
|
|
Click here |
12. DISCONNECT TRANSMISSION CONTROL CABLE ASSEMBLY (Transaxle Side)
|
|
Click here |
13. REMOVE TRANSMISSION CONTROL CABLE ASSEMBLY
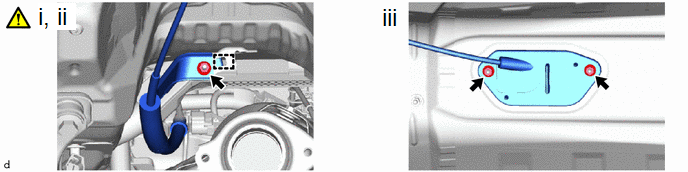
(1) Remove the nut.
(2) Disengage the guide to separate the transmission control cable assembly from the vehicle body.
(3) Remove the 2 nuts and transmission control cable assembly from the vehicle body.


