Toyota Corolla Cross: Operation Check
OPERATION CHECK
PRECAUTION FOR OPERATION CHECK
.png)
- Be sure to read Precaution thoroughly before servicing.
Click here .gif)
- Be sure to correctly follow the removal and installation procedures for the SRS parts.
NOTICE:
If there is any damage or deformation of airbag installation components or the areas they are installed to, do not attempt to repair them. Replace the damaged components with new ones.
CHECK SRS WARNING LIGHT
(a) Primary check

(1) Turn the ignition switch to ON and check that the SRS warning light turns on.
(2) Turn the ignition switch off. Wait for at least 2 seconds, then turn the ignition switch to ON. The SRS warning light comes on for approximately 6 seconds and diagnosis of the airbag system is performed.
HINT:
- If the SRS warning light remains on for approximately 6 seconds or more after the ignition switch has been turned to ON, there may be a malfunction in the SRS airbag system.
- If the SRS warning light occasionally turns on approximately 6 seconds or more after the ignition switch has been turned to ON, there may be a short to +B, short to ground or an open in the SRS warning light circuit.
- If the SRS warning light illuminates after turning the ignition switch off or to ACC, there may be a malfunction in the power source circuit or combination meter assembly.
- The SRS warning light turns off, and then turns on. This blinking pattern indicates a power source voltage drop. The SRS warning light turns off 6 to 10 seconds after the power source voltage returns to normal.
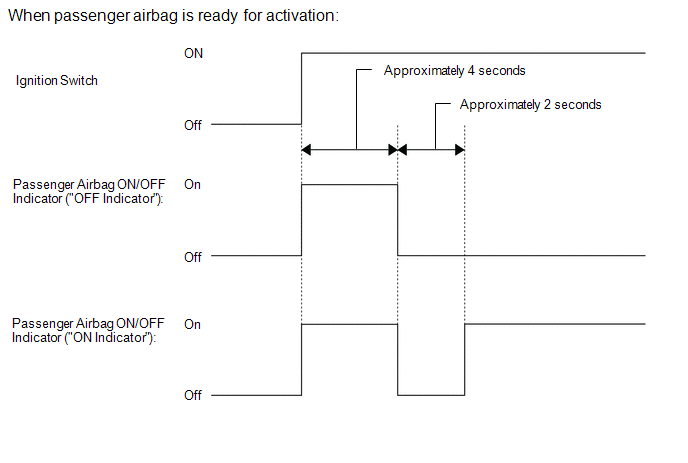
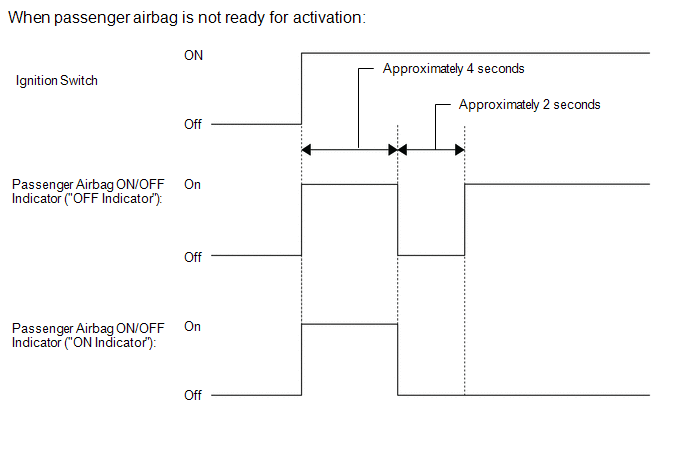
FUNCTION OF PASSENGER AIRBAG ON/OFF INDICATOR
(a) Initial check
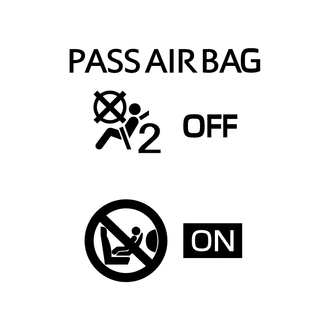
(1) Turn the ignition switch to ON.
(2) The passenger airbag ON/OFF indicator comes on for approximately 4 seconds, then turns off for approximately 2 seconds.
(3) Approximately 6 seconds after the ignition switch is turned to ON, the passenger airbag ON/OFF indicator will indicate ON/OFF depending on the following conditions.
Indicator Operation
|
Front Passenger Seat Condition |
Passenger Airbag ON/OFF Indicator |
SRS Warning Light |
|
ON Indicator | OFF Indicator |
|
Vacant | OFF |
ON | OFF |
|
Adult*1 is seated | ON |
OFF | OFF |
|
Child*2 is seated | ON or OFF*2 |
OFF or ON*2 | OFF |
|
Child restraint system is installed |
OFF | ON |
OFF |
| Occupant classification system failure |
OFF | ON |
ON |
- *1: The system judges a person of average adult weight or more as an adult. If a smaller adult sits in the front passenger seat, the system may not recognize them as an adult depending on their physique and posture.
- *2: The system may not recognize a child or a child in a child restraint system as a child depending on factors such as the positioning of the child restraint system or the child's physique or posture.
HINT:
- The passenger airbag ON/OFF indicator illuminates based on the following timing chart in order to check the indicator light circuit.
- When the occupant classification system is malfunctioning, both the SRS warning light and passenger airbag ON/OFF indicator ("OFF") come on. In this case, perform troubleshooting for the airbag system DTCs first.
INSPECT AIRBAG COMPONENTS
(a) Inspect the SRS parts in table below.
|
Component to Inspect | Procedure |
|
Horn button assembly |
- Perform a diagnostic system check.
- Visually check for defects with the horn button assembly installed to the vehicle.
HINT:
The defects are as follows:
- Cuts on the surface or in the grooves
- Small cracks on the surface or in the grooves
- Significant discoloration on the surface or in the grooves
OK:
No defects are found.
If any defects are found, replace the horn button assembly with a new one.
|
| Lower No. 1 instrument panel airbag assembly |
- Perform a diagnostic system check.
- Visually check for defects with the lower No. 1 instrument panel airbag assembly installed to the vehicle.
HINT:
The defects are as follows:
- Cuts
- Small cracks
- Significant discoloration
OK:
No defects are found.
If any defects are found, replace the lower No. 1 instrument panel airbag assembly with a new one.
|
| Instrument panel passenger without door airbag assembly |
- Perform a diagnostic system check.
- Visually check for defects with the instrument panel passenger without door airbag assembly installed to the vehicle.
HINT:
The defects are as follows:
- Cuts on the instrument panel safety pad assembly around the instrument panel passenger without door airbag assembly
- Small cracks on the instrument panel safety pad assembly around the instrument panel passenger without door airbag assembly
- Significant discoloration on the instrument panel safety pad assembly around the instrument panel passenger without door airbag assembly
OK:
No defects are found.
If any defects are found, replace the instrument panel safety pad assembly with a new one.
|
| Curtain shield airbag assembly |
- Perform a diagnostic system check.
- Visually check for defects with the curtain shield airbag assemblies installed to the vehicle.
HINT:
The defects are as follows:
- Cuts on each pillar garnish or the roof headlining assembly around the curtain shield airbag assemblies
- Small cracks on each pillar garnish or the roof headlining assembly around the curtain shield airbag assemblies
- Significant discoloration on each pillar garnish or the roof headlining assembly around the curtain shield airbag assemblies
OK:
No defects are found.
If any defects are found, replace each pillar garnish or the roof headlining assembly with a new one.
|
| Front seat airbag assembly |
- Perform a diagnostic system check.
- Visually check for defects with the front seat airbag assemblies installed to the vehicle.
HINT:
The defects are as follows:
- Scratches, broken or frayed threads on the surface of the front seatback assembly around the front seat airbag assemblies
- Small cracks on the front seatback assembly around the front seat airbag assemblies
- Significant discoloration on the front seatback assembly around the front seat airbag assemblies
OK:
No defects are found.
If any defects are found, replace the front seatback pad with cover with a new one.
|
| Rear seat airbag assembly |
- Perform a diagnostic system check.
- Visually check for defects with the rear seat airbag assemblies installed to the vehicle.
HINT:
The defects are as follows:
- Scratches, broken or frayed threads on the surface of the rear seatback assembly around the rear seat airbag assemblies
- Small cracks in the rear seatback assembly around the rear seat airbag assemblies
- Significant discoloration on the rear seatback assembly around the rear seat airbag assemblies
OK:
No defects are found.
If any defects are found, replace the bench type rear seatback pad or bench type rear seatback cover with a new one.
|
| Front seat outer belt assembly |
- Perform a diagnostic system check.
- Visually check for defects with the front seat outer belt assemblies installed to the vehicle.
HINT:
The defects are as follows:
- Cuts
- Small cracks
- Significant discoloration
OK:
No defects are found.
If any defects are found, replace the front seat outer belt assembly with a new one.
|
| Rear seat outer belt assembly |
- Perform a diagnostic system check.
- Visually check for defects with the rear seat outer belt assemblies installed to the vehicle.
HINT:
The defects are as follows:
- Cuts
- Small cracks
- Significant discoloration
OK:
No defects are found.
If any defects are found, replace the rear seat outer belt assembly with a new one.
|
| Airbag ECU assembly |
- Perform a diagnostic system check.
|
| Front airbag sensor |
|
Side airbag pressure sensor |
|
No. 1 side airbag sensor |
|
Harness and connector |
READ NEXT:
UTILITY WRITE VIN/VEHICLE IDENTIFICATION NUMBER
NOTICE:
When the airbag sensor assembly is replaced, it is necessary to write the VIN/Vehicle Identification Number.
Since the VIN informatio
PROBLEM SYMPTOMS TABLE HINT: Use the table below to help determine the cause of problem symptoms. If multiple suspected areas are listed, the potential causes of the symptoms are listed in order of pr
TERMINALS OF ECU AIRBAG ECU ASSEMBLY
Terminal No. Terminal Symbol
Destination O1-3
PLR- Rear pretensioner squib LH (Rear seat outer belt assembly LH)
O1-4 PLR+
SEE MORE:
INSPECTION PROCEDURE 1. INSPECT DOOR CONTROL TRANSMITTER SUB-ASSEMBLY
(a) Inspect operation of the door control transmitter sub-assembly. (1) Remove the transmitter battery from the door control transmitter sub-assembly.
Click here
(2) Install a new or non-depleted transmitter battery.
DESCRIPTION
Refer to DTC C050612
Click here
DTC No.
Detection Item
DTC Detection Condition
Trouble Area
MIL
DTC Output from
Note
C05061C
Right Front Wheel Speed Sensor Circuit Voltage Out


