Toyota Corolla Cross: Installation
INSTALLATION
CAUTION / NOTICE / HINT
COMPONENTS (INSTALLATION)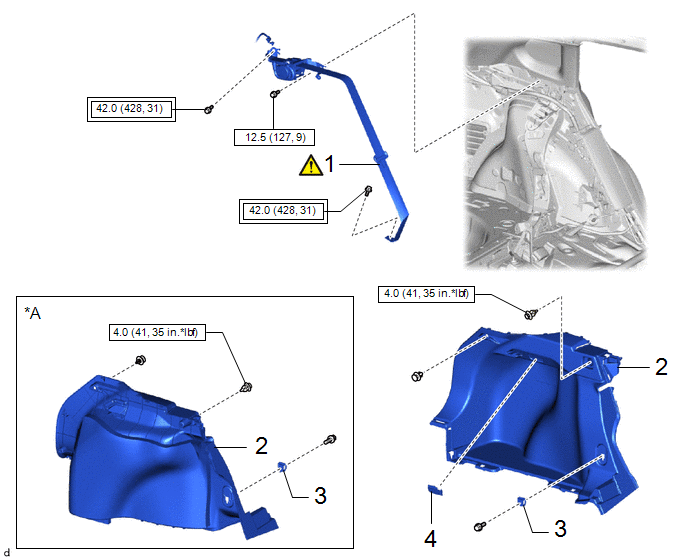
|
Procedure | Part Name Code |
.png) |
.png) |
 |
|---|---|---|---|---|---|
|
1 | REAR SEAT OUTER BELT ASSEMBLY |
73370E |
|
- | - |
|
2 | DECK TRIM SIDE PANEL ASSEMBLY |
64740C | - |
- | - |
|
3 | LUGGAGE HOLD BELT STRIKER ASSEMBLY |
58460D | - |
- | - |
|
4 | NO. 1 LUGGAGE COMPARTMENT LIGHT ASSEMBLY |
81330 | - |
- | - |
|
*A | for RH Side |
- | - |
.png) |
Tightening torque for "Major areas involving basic vehicle performance such as moving/turning/stopping": N*m (kgf*cm, ft.*lbf) |
.png) |
N*m (kgf*cm, ft.*lbf): Specified torque |
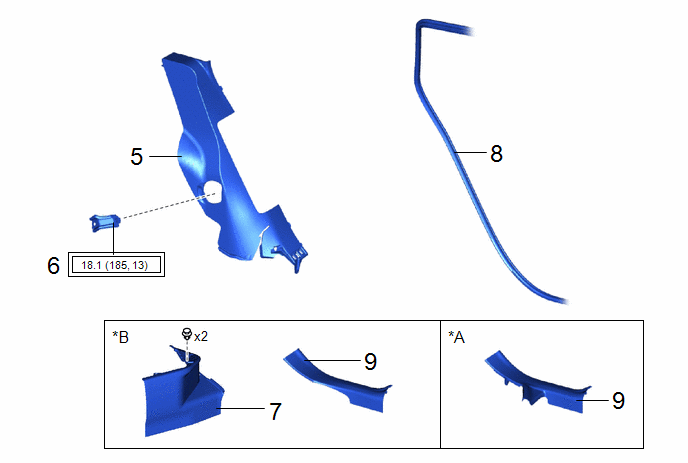
|
Procedure | Part Name Code |
.png) |
.png) |
 |
|---|---|---|---|---|---|
|
5 | REAR SEAT SIDE GARNISH |
62552F | - |
- | - |
|
6 | REAR SEATBACK HINGE SUB-ASSEMBLY |
71304C | - |
- | - |
|
7 | REAR UNDER SIDE COVER LH |
76974E | - |
- | - |
|
8 | REAR DOOR OPENING TRIM WEATHERSTRIP |
62332A | - |
- | - |
|
9 | REAR DOOR SCUFF PLATE |
67918A | - |
- | - |
|
*A | for Gasoline Model |
*B | for HEV Model |
.png) |
Tightening torque for "Major areas involving basic vehicle performance such as moving/turning/stopping": N*m (kgf*cm, ft.*lbf) |
- | - |
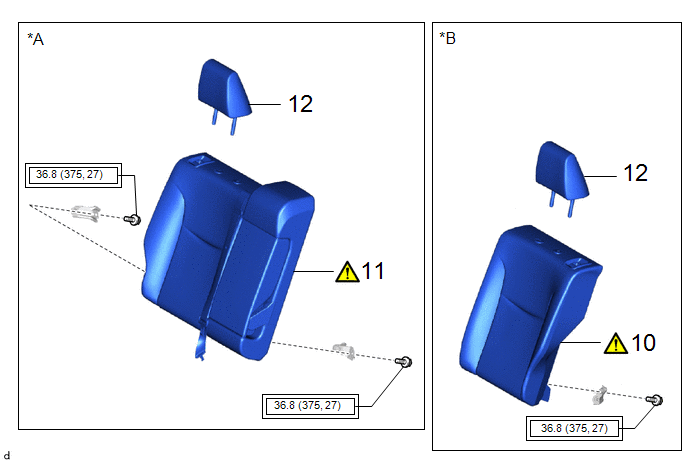
|
Procedure | Part Name Code |
.png) |
.png) |
 |
|---|---|---|---|---|---|
|
10 | REAR SEATBACK ASSEMBLY LH |
- |
|
- | - |
|
11 | REAR SEATBACK ASSEMBLY RH |
- |
|
- | - |
|
12 | REAR SEAT CENTER HEADREST ASSEMBLY |
71940A | - |
- | - |
|
*A | for RH Side |
*B | for LH Side |
.png) |
Tightening torque for "Major areas involving basic vehicle performance such as moving/turning/stopping": N*m (kgf*cm, ft.*lbf) |
- | - |
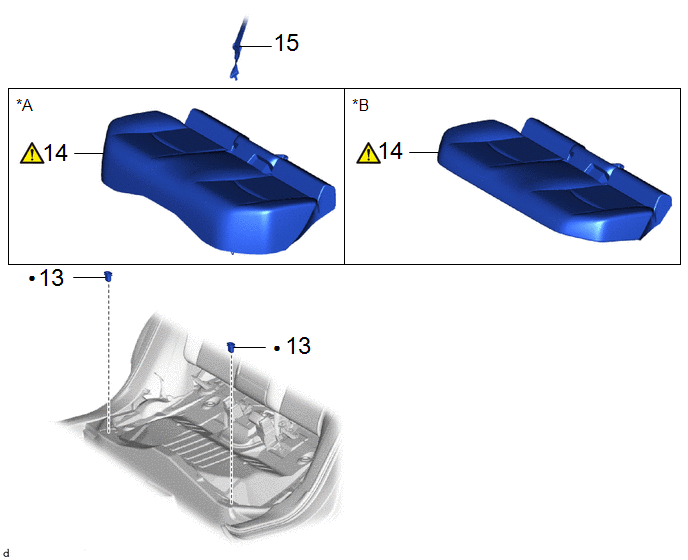
|
Procedure | Part Name Code |
.png) |
.png) |
 |
|---|---|---|---|---|---|
|
13 | REAR SEAT CUSHION LOCK HOOK |
72693 | - |
- | - |
|
14 | BENCH TYPE REAR SEAT CUSHION ASSEMBLY |
- |
|
- | - |
|
15 | REAR CENTER SEAT OUTER BELT |
73350C | - |
- | - |
|
*A | for Gasoline Model |
*B | for HEV Model |
|
● | Non-reusable part |
- | - |
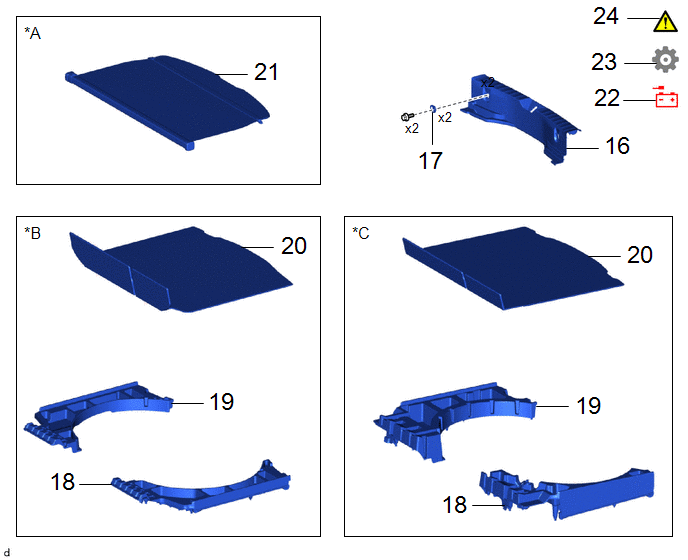
|
Procedure | Part Name Code |
.png) |
.png) |
 |
|---|---|---|---|---|---|
|
16 | REAR DECK TRIM COVER |
64716D | - |
- | - |
|
17 | LUGGAGE HOLD BELT STRIKER ASSEMBLY |
58460D | - |
- | - |
|
18 | DECK FLOOR BOX RH |
64995 | - |
- | - |
|
19 | DECK FLOOR BOX LH |
64997 | - |
- | - |
|
20 | DECK BOARD ASSEMBLY |
58410B | - |
- | - |
|
21 | TONNEAU COVER ASSEMBLY |
64910J | - |
- | - |
|
22 | CABLE TO NEGATIVE AUXILIARY BATTERY TERMINAL |
- | - |
- | - |
|
23 | INSPECT SRS WARNING LIGHT |
- | - |
- |
|
|
24 | INITIALIZATION AFTER RECONNECTING AUXILIARY BATTERY TERMINAL |
- |
|
- | - |
|
*A | w/ Tonneau Cover |
*B | for Full Size Spare Tire |
|
*C | for Compact Spare Tire |
- | - |
CAUTION / NOTICE / HINT
HINT:
- Use the same procedure for the RH side and LH side.
- The following procedure is for the LH side.
PROCEDURE
1. INSTALL REAR SEAT OUTER BELT ASSEMBLY
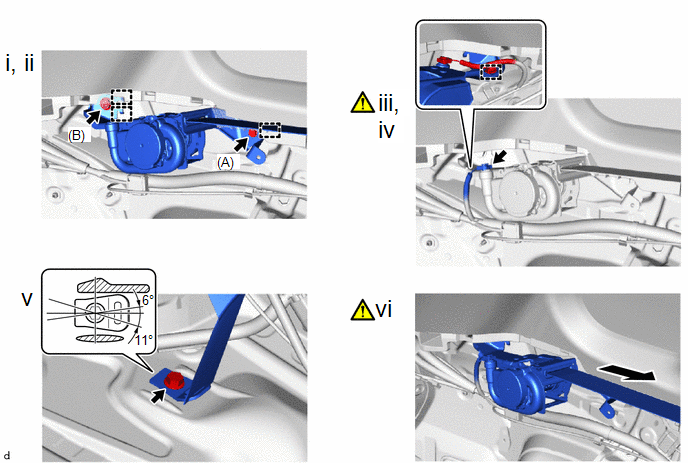
.png) |
Protruding Part | - |
- |
(1) Engage the 3 guides and temporarily install the rear seat outer belt assembly with the 2 bolts.
(2) Fully tighten the bolt (A) and then the bolt (B) to install the rear seat outer belt assembly.
Torque:
Bolt A :
12.5 N·m {127 kgf·cm, 9 ft·lbf}
Bolt B :
42 N·m {428 kgf·cm, 31 ft·lbf}
(3) Connect the pretensioner connector.
HINT:
Refer to How to Connect or Disconnect Airbag Connector:
Click here
.gif)
(4) Engage the clamp.
(5) Install the floor anchor of the rear seat outer belt assembly with the bolt.
Torque:
42 N·m {428 kgf·cm, 31 ft·lbf}
NOTICE:
Do not allow the anchor part of the rear seat outer belt assembly to overlap the protruding parts of the floor panel.
(6) Check that the ELR locks.
- With the rear seat outer belt assembly installed to the vehicle, check that the belt locks when it is pulled out quickly.
NOTICE:
This check should be performed with the rear seat outer belt assembly installed to the vehicle.
2. INSTALL DECK TRIM SIDE PANEL ASSEMBLY
Click here
.gif)
3. INSTALL LUGGAGE HOLD BELT STRIKER ASSEMBLY
4. INSTALL NO. 1 LUGGAGE COMPARTMENT LIGHT ASSEMBLY (for LH Side)
5. INSTALL REAR SEAT SIDE GARNISH
6. INSTALL REAR SEAT BACK HINGE SUB-ASSEMBLY
Click here
.gif)
7. INSTALL REAR UNDER SIDE COVER LH (for HEV Model)
8. INSTALL REAR DOOR OPENING TRIM WEATHERSTRIP
9. INSTALL REAR UNDER SIDE COVER
10. INSTALL REAR DOOR SCUFF PLATE
11. INSTALL REAR SEATBACK ASSEMBLY LH (for LH Side)
.png) |
Click here |
12. INSTALL REAR SEATBACK ASSEMBLY RH (for RH Side)
.png) |
Click here |
13. INSTALL REAR SEAT HEADREST ASSEMBLY
14. INSTALL REAR SEAT CUSHION LOCK HOOK
15. INSTALL BENCH TYPE REAR SEAT CUSHION ASSEMBLY
.png) |
|
16. INSTALL REAR CENTER SEAT OUTER BELT ASSEMBLY
17. INSTALL REAR DECK TRIM COVER
18. INSTALL LUGGAGE HOLD BELT STRIKER ASSEMBLY
19. INSTALL DECK FLOOR BOX RH
20. INSTALL DECK FLOOR BOX LH
21. INSTALL DECK BOARD ASSEMBLY
22. INSTALL TONNEAU COVER ASSEMBLY
23. CONNECT CABLE TO NEGATIVE AUXILIARY BATTERY TERMINAL
- for Gasoline Model
Click here
.gif)
- for HEV Model
Click here
.gif)
24. INSPECT SRS WARNING LIGHT
.png) |
|
25. INITIALIZATION AFTER RECONNECTING AUXILIARY BATTERY TERMINAL
HINT:
When disconnecting and reconnecting the auxiliary battery, there is an automatic learning function that completes learning when the respective system is used.
Click here .gif)


