Toyota Corolla Cross: Installation
INSTALLATION
CAUTION / NOTICE / HINT
|
Procedure |
Part Name Code |
.png) |
.png) |
.png) |
|
|---|---|---|---|---|---|
|
1 |
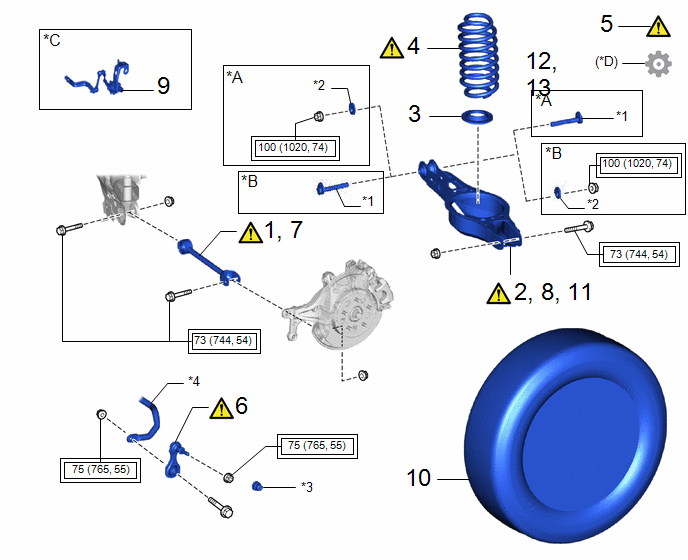
TEMPORARILY TIGHTEN REAR NO. 1 SUSPENSION ARM ASSEMBLY |
48720A |
|
- |
- |
|
2 |
TEMPORARILY TIGHTEN REAR NO. 2 SUSPENSION ARM ASSEMBLY |
48740F |
|
- |
- |
|
3 |
REAR LOWER COIL SPRING INSULATOR |
48259A |
- |
- |
- |
|
4 |
REAR COIL SPRING |
48231B |
|
- |
- |
|
5 |
STABILIZE SUSPENSION |
- |
|
- |
- |
|
6 |
REAR STABILIZER LINK ASSEMBLY |
48840A |
|
- |
- |
|
7 |
FULLY TIGHTEN REAR NO. 1 SUSPENSION ARM ASSEMBLY |
48720A |
|
- |
- |
|
8 |
FULLY TIGHTEN REAR NO. 2 SUSPENSION ARM ASSEMBLY |
48740F |
|
- |
- |
|
9 |
REAR HEIGHT CONTROL SENSOR SUB-ASSEMBLY LH |
89408C |
- |
- |
- |
|
10 |
REAR WHEEL |
- |
- |
- |
- |
|
11 |
FULLY TIGHTEN REAR NO. 2 SUSPENSION ARM ASSEMBLY |
48740F |
|
- |
- |
|
12 |
INSPECT AND ADJUST REAR WHEEL ALIGNMENT |
- |
- |
- |
|
|
13 |
PERFORM CALIBRATION |
- |
- |
- |
|
|
*A |
for Gasoline Model |
*B |
for HEV Model |
|
*C |
for LH Side |
*D |
w/ Parking Assist Monitor System |
|
*1 |
REAR SUSPENSION TOE ADJUST CAM SUB-ASSEMBLY |
*2 |
NO. 2 CAMBER ADJUST CAM |
|
*3 |
CAP |
*4 |
REAR STABILIZER BAR |
.png) |
Tightening torque for "Major areas involving basic vehicle performance such as moving/turning/stopping" : N*m (kgf*cm, ft.*lbf) |
- |
- |
CAUTION / NOTICE / HINT
HINT:
- Use the same procedure for the RH side and LH side.
- The following procedure is for the LH side.
PROCEDURE
1. TEMPORARILY TIGHTEN REAR NO. 1 SUSPENSION ARM ASSEMBLY
|
|
NOTICE:
|
2. TEMPORARILY TIGHTEN REAR NO. 2 SUSPENSION ARM ASSEMBLY
|
|
NOTICE:
|
3. INSTALL REAR LOWER COIL SPRING INSULATOR
4. INSTALL REAR COIL SPRING
|
|
Click here |
5. STABILIZE SUSPENSION
Click here .gif)
6. INSTALL REAR STABILIZER LINK ASSEMBLY
|
|
Click here |
7. FULLY TIGHTEN REAR NO. 1 SUSPENSION ARM ASSEMBLY
|
|
NOTICE: Tighten the bolt with the nut secured. |
Torque:
73 N·m {744 kgf·cm, 54 ft·lbf}
8. FULLY TIGHTEN REAR NO. 2 SUSPENSION ARM ASSEMBLY
|
|
NOTICE: Tighten the bolt with the nut secured. |
Torque:
for Rear Axle Carrier Sub-assembly Side :
73 N·m {744 kgf·cm, 54 ft·lbf}
9. INSTALL REAR HEIGHT CONTROL SENSOR SUB-ASSEMBLY LH (w/ Height Control Sensor)
for LH Side:
Click here
10. INSTALL REAR WHEEL
Click here
11. FULLY TIGHTEN REAR NO. 2 SUSPENSION ARM ASSEMBLY
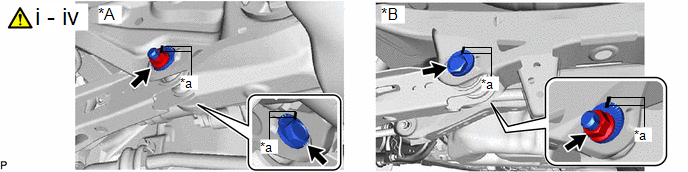
(a) for Rear Suspension Member Sub-assembly Side:
|
*A |
for HEV Model |
*B |
for Gasoline Model |
|
*a |
Matchmark |
- |
- |
(1) Lower the vehicle to the ground.
(2) Bounce the vehicle up and down at the corners to stabilize the rear suspension.
(3) Align the matchmarks on the No. 2 camber adjust cam, rear suspension toe adjust cam sub-assembly and rear suspension member sub-assembly.
(4) Fully tighten the nut.
Torque:
100 N·m {1020 kgf·cm, 74 ft·lbf}
NOTICE:
- Hold the rear suspension toe adjust cam sub-assembly while rotating the nut.
- Make sure that the vehicle is unloaded when fully tightening the nut.
12. INSPECT AND ADJUST REAR WHEEL ALIGNMENT
Click here
13. PERFORM CALIBRATION (w/ Parking Assist Monitor System)
|
Parking assist monitor system |
|
|
Automatic headlight beam level control system |
|


