Toyota Corolla Cross: Installation
INSTALLATION
CAUTION / NOTICE / HINT
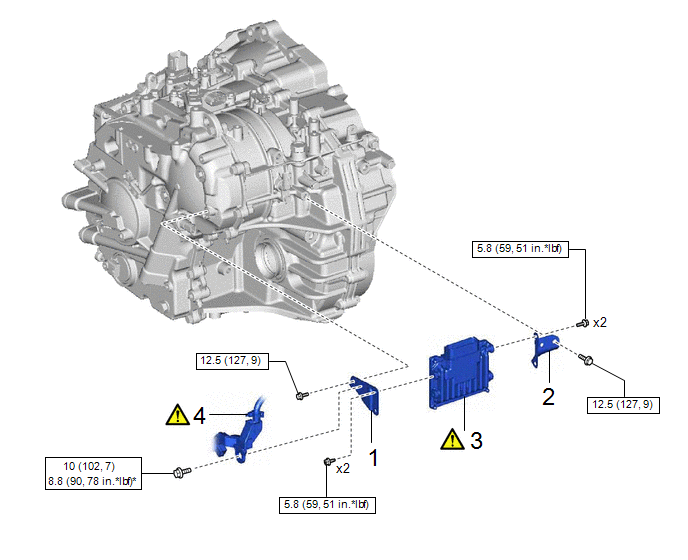
COMPONENTS (INSTALLATION)
|
Procedure |
Part Name Code |
.png) |
.png) |
.png) |
|
|---|---|---|---|---|---|
|
1 |
NO. 2 TRANSMISSION CONTROL ECU BRACKET |
89539N |
- |
- |
- |
|
2 |
NO. 1 TRANSMISSION CONTROL ECU BRACKET |
89539M |
- |
- |
- |
|
3 |
TCM |
89535B |
|
- |
- |
|
4 |
ENGINE WIRE |
82121 |
|
- |
- |
.png) |
N*m (kgf*cm, ft.*lbf): Specified torque |
* |
For use with a union nut wrench |

|
Procedure |
Part Name Code |
.png) |
.png) |
.png) |
|
|---|---|---|---|---|---|
|
5 |
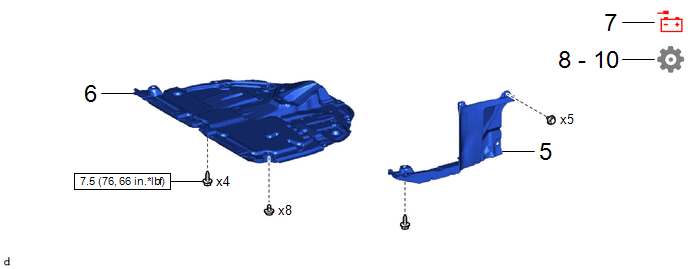
REAR ENGINE UNDER COVER LH |
51444A |
- |
- |
- |
|
6 |
NO. 1 ENGINE UNDER COVER ASSEMBLY |
51410 |
- |
- |
- |
|
7 |
CONNECT CABLE TO NEGATIVE AUXILIARY BATTERY TERMINAL |
- |
- |
- |
- |
|
8 |
UPDATE ECU SECURITY KEY |
- |
- |
- |
|
|
9 |
RESET MEMORY |
- |
- |
- |
|
|
10 |
INITIALIZATION AFTER RECONNECTING AUXILIARY BATTERY TERMINAL |
- |
- |
- |
|
.png) |
N*m (kgf*cm, ft.*lbf): Specified torque |
- |
- |
CAUTION / NOTICE / HINT
NOTICE:
- After replacing the TCM, make sure to perform update ECU security key.
- After performing the update ECU security key procedure, make sure to perform the initialization procedure for when the cable has been disconnected and reconnected to the negative (-) auxiliary battery terminal.
PROCEDURE
1. INSTALL NO. 2 TRANSMISSION CONTROL ECU BRACKET
Torque:
5.8 N·m {59 kgf·cm, 51 in·lbf}
2. INSTALL NO. 1 TRANSMISSION CONTROL ECU BRACKET
Torque:
5.8 N·m {59 kgf·cm, 51 in·lbf}
3. INSTALL TCM

(1) Install the TCM to the continuously variable transaxle assembly with the 2 bolts.
Torque:
12.5 N·m {127 kgf·cm, 9 ft·lbf}
(2) Connect the connector and rotate the lever and engage the claw.
NOTICE:
Rotate the lever until the claw of the connector makes a click sound.
4. INSTALL ENGINE WIRE

|
*a |
Torque Wrench Fulcrum Length |
- |
- |
(1) Using a 10 mm union nut wrench, install the engine wire to the No. 2 transmission control ECU bracket with the bolt.
Torque:
Specified Tightening Torque :
10 N·m {102 kgf·cm, 7 ft·lbf}
HINT:
- Calculate the torque wrench reading when changing the fulcrum length of
the torque wrench.
Click here
.gif)
- When using a 10 mm union nut wrench (fulcrum length of 22 mm (0.866 in.)) + torque wrench (fulcrum length of 162mm (6.38 in.)): 8.8 N*m (90 kgf*cm, 78 in.*lbf)
5. INSTALL REAR ENGINE UNDER COVER LH
6. INSTALL NO. 1 ENGINE UNDER COVER ASSEMBLY
Click here .gif)
7. CONNECT CABLE TO NEGATIVE AUXILIARY BATTERY TERMINAL
Click here .gif)
8. UPDATE ECU SECURITY KEY
Click here .gif)
9. RESET MEMORY
NOTICE:
If continuously variable transaxle parts have been replaced, refer to Parts Replacement Compensation Table to determine if any additional operations are necessary.
Click here .gif)
10. INITIALIZATION AFTER RECONNECTING AUXILIARY BATTERY TERMINAL
HINT:
When disconnecting and reconnecting the auxiliary battery, there is an automatic learning function that completes learning when the respective system is used.
Click here .gif)


