Toyota Corolla Cross: Gf1a Transfer Oil
Components
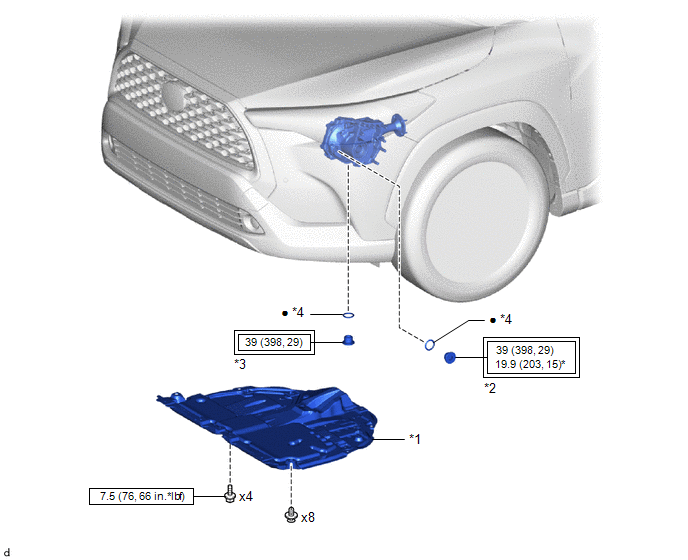
COMPONENTS
ILLUSTRATION
|
*1 |
NO. 1 ENGINE UNDER COVER ASSEMBLY |
*2 |
TRANSFER FILLER PLUG |
|
*3 |
TRANSFER DRAIN PLUG |
*4 |
GASKET |
.png) |
Tightening torque for "Major areas involving basic vehicle performance such as moving/turning/stopping": N*m (kgf*cm, ft.*lbf) |
.png) |
N*m (kgf*cm, ft.*lbf): Specified torque |
|
* |
For use with SST and union nut wrench |
● |
Non-reusable part |
Replacement
REPLACEMENT
CAUTION / NOTICE / HINT
NOTICE:
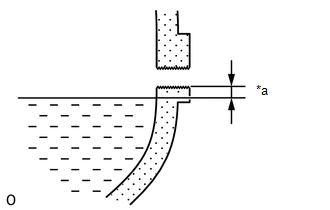
- The plug shown in the illustration is not the transfer filler plug, so do
not attempt to fill transfer oil via this plug.
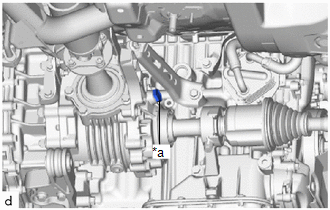
*a
NOT the Transfer Filler Plug
- Filling transfer oil via this plug will cause the transfer oil to be overfilled, resulting in oil leakage.
PROCEDURE
1. REMOVE NO. 1 ENGINE UNDER COVER ASSEMBLY
Click here .gif)
2. DRAIN TRANSFER OIL
(a) Stop the vehicle on a level surface.
|
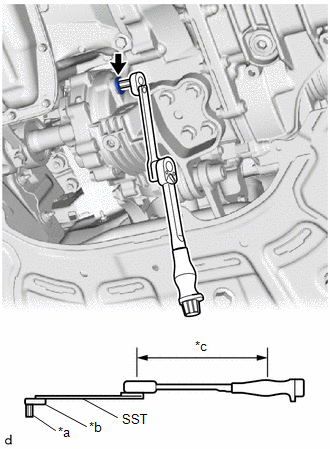
(b) Using a 10 mm straight hexagon wrench and 10 x 12 mm long offset wrench, remove the transfer filler plug and gasket. |
|
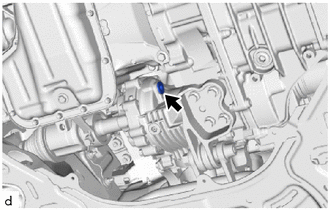
|
(c) Using a 10 mm hexagon socket wrench, remove the transfer drain plug and gasket and drain the transfer oil. |
|
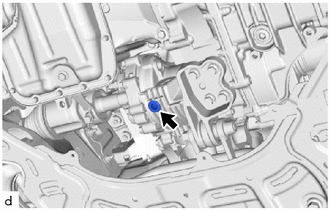
(d) Using a 10 mm hexagon socket wrench, install a new gasket and the transfer drain plug.
Torque:
39 N·m {398 kgf·cm, 29 ft·lbf}
3. ADD TRANSFER OIL
(a) Add transfer oil.
Standard oil type and viscosity:
Toyota Genuine Differential Gear Oil LT 75W-85 GL-5 or equivalent
Standard oil capacity:
0.45 liters (0.47 US qts, 0.39 Imp. qts)
|
(b) Pour oil so that the oil level is between 0 to 5 mm (0 to 0.197 in.) from the bottom lip of the transfer filler plug hole. NOTICE:
|
|
(c) Wait approximately 5 minutes and check that the oil level has not changed.
|
(d) Using SST, 10 mm straight hexagon wrench and 10 mm union nut wrench, install a new gasket and the transfer filler plug. SST: 09961-00950 Torque: Specified tightening torque : 39 N·m {398 kgf·cm, 29 ft·lbf} HINT:
|
|
(e) Drive the vehicle and check the oil level again. If necessary, add transfer oil.
4. INSPECT FOR TRANSFER OIL LEAK
(a) Make sure that there are no transfer oil leaks from the area that was worked on.
5. INSTALL NO. 1 ENGINE UNDER COVER ASSEMBLY
Click here


