Toyota Corolla Cross: Reassembly
REASSEMBLY
CAUTION / NOTICE / HINT
COMPONENTS (REASSEMBLY)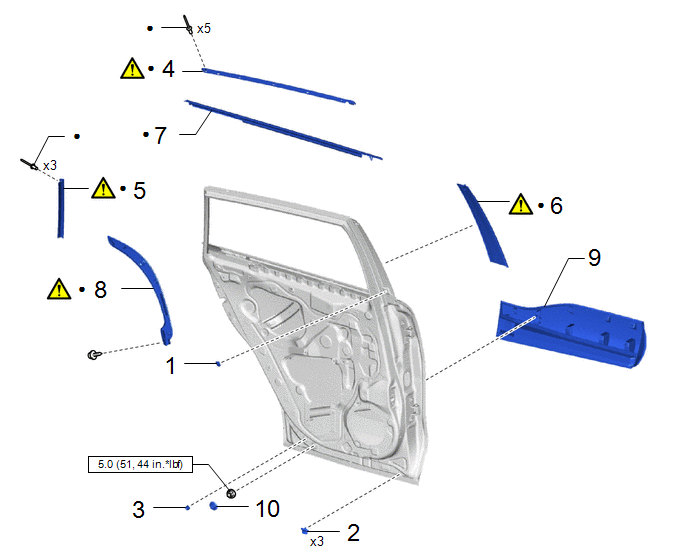
|
Procedure | Part Name Code |
.png) |
.png) |
 |
|---|---|---|---|---|---|
|
1 | DOOR WINDOW FRAME MOULDING CLIP |
75792 | - |
- | - |
|
2 | REAR DOOR DUST PROOF SEAL |
67837C | - |
- | - |
|
3 | REAR DOOR PANEL CUSHION |
67003C | - |
- | - |
|
4 | REAR DOOR WINDOW FRAME UPPER MOULDING |
75764A |
|
- | - |
|
5 | REAR DOOR WINDOW FRAME MOULDING(REAR PILLAR SIDE) |
75766B |
|
- | - |
|
6 | REAR DOOR WINDOW FRAME MOULDING(CENTER PILLAR SIDE) |
75762B |
|
- | - |
|
7 | REAR DOOR BELT MOULDING ASSEMBLY |
75740 | - |
- | - |
|
8 | REAR DOOR OUTSIDE MOULDING SUB-ASSEMBLY |
75076 |
|
- | - |
|
9 | REAR DOOR OUTSIDE LOWER MOULDING SUB-ASSEMBLY |
75078 | - |
- | - |
|
10 | HOLE PLUG |
- | - |
- | - |
.png) |
N*m (kgf*cm, ft.*lbf): Specified torque |
● | Non-reusable part |

|
Procedure | Part Name Code |
|
|
| |
|---|---|---|---|---|---|
|
11 | REAR DOOR OUTSIDE HANDLE FRAME SUB-ASSEMBLY |
69204A |
|
- | - |
|
12 | REAR DOOR OUTSIDE HANDLE REAR PAD |
69242G | - |
- | - |
|
13 | REAR DOOR OUTSIDE HANDLE FRONT PAD |
69241G | - |
- | - |
|
14 | REAR DOOR OUTSIDE HANDLE COVER |
69227L | - |
- | - |
|
15 | REAR DOOR OUTSIDE HANDLE ASSEMBLY |
69240 | - |
- | - |
|
16 | REAR DOOR LOCK WITH MOTOR ASSEMBLY |
69060A |
|
- | - |
|
17 | REAR DOOR WINDOW REGULATOR ASSEMBLY |
- |
|
- | - |
|
|
N*m (kgf*cm, ft.*lbf): Specified torque |
.png) |
MP Grease |
|
Procedure | Part Name Code |
|
|
| |
|---|---|---|---|---|---|
|
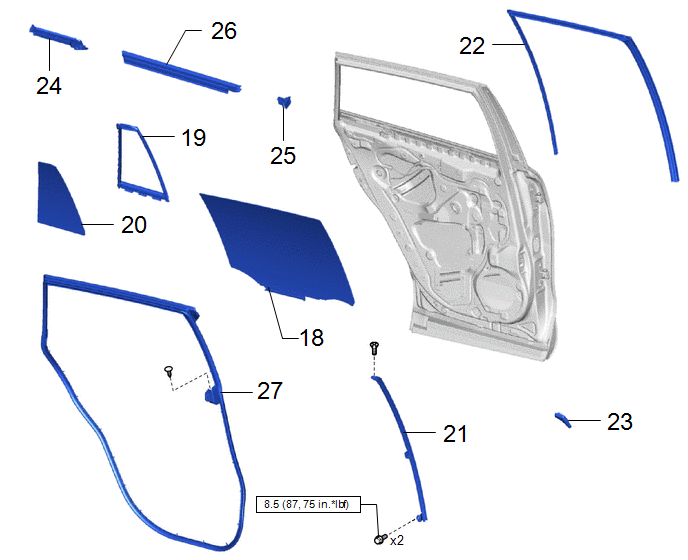
18 | REAR DOOR GLASS SUB-ASSEMBLY |
68104 | - |
- | - |
|
19 | REAR DOOR QUARTER WINDOW WEATHERSTRIP |
68189 | - |
- | - |
|
20 | REAR DOOR QUARTER WINDOW GLASS |
68124B | - |
- | - |
|
21 | REAR DOOR WINDOW DIVISION BAR SUB-ASSEMBLY |
67408H | - |
- | - |
|
22 | REAR DOOR GLASS RUN |
68152C | - |
- | - |
|
23 | REAR DOOR FRAME GARNISH |
67674A | - |
- | - |
|
24 | REAR DOOR REAR BELT SEAL |
68199 | - |
- | - |
|
25 | REAR DOOR FRONT BELT SEAL |
68197A | - |
- | - |
|
26 | REAR DOOR GLASS INNER WEATHERSTRIP |
68174A | - |
- | - |
|
27 | REAR DOOR WEATHERSTRIP |
67872 | - |
- | - |
|
|
N*m (kgf*cm, ft.*lbf): Specified torque |
- | - |
|
Procedure | Part Name Code |
|
|
| |
|---|---|---|---|---|---|
|
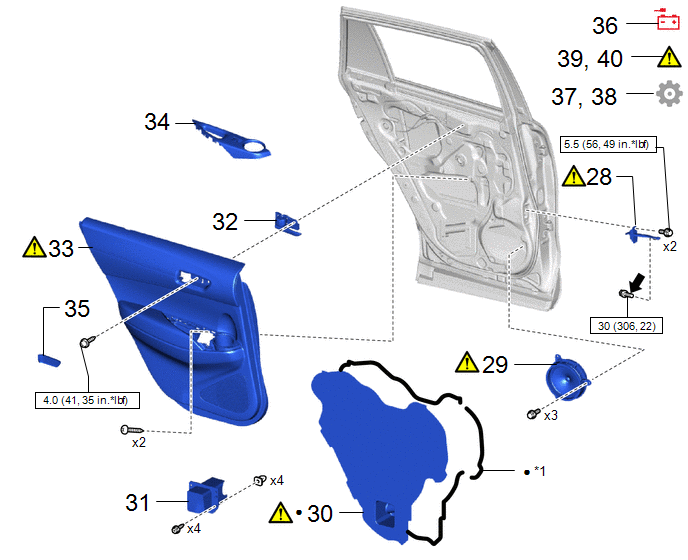
28 | REAR DOOR CHECK ASSEMBLY |
68630 |
|
- | - |
|
29 | REAR SPEAKER ASSEMBLY |
86160B |
|
- | - |
|
30 | REAR DOOR SERVICE HOLE COVER |
67842E |
|
- | - |
|
31 | REAR DOOR INSIDE PANEL REINFORCE SUB-ASSEMBLY |
67058 | - |
- | - |
|
32 | REAR DOOR INSIDE HANDLE SUB-ASSEMBLY |
69206C | - |
- | - |
|
33 | REAR DOOR TRIM BOARD SUB-ASSEMBLY |
67604 |
|
- | - |
|
34 | REAR POWER WINDOW REGULATOR SWITCH ASSEMBLY WITH REAR DOOR ARMREST BASE PANEL |
- | - |
- | - |
|
35 | REAR DOOR INSIDE HANDLE BEZEL PLUG |
69284G | - |
- | - |
|
36 | CONNECT CABLE TO NEGATIVE AUXILIARY BATTERY TERMINAL |
- | - |
- | - |
|
37 | INITIALIZATION AFTER RECONNECTING AUXILIARY BATTERY TERMINAL |
- | - |
- |
|
|
38 | INITIALIZE POWER WINDOW CONTROL SYSTEM |
- | - |
- |
|
|
39 | INSPECT WINDOW CONTROL OPERATION |
- |
|
- | - |
|
40 | INSPECT POWER DOOR LOCK CONTROL SYSTEM |
- |
|
- | - |
|
*1 | BUTYL TAPE |
- | - |
|
|
N*m (kgf*cm, ft.*lbf): Specified torque |
● | Non-reusable part |
|
|
Toyota Genuine Adhesive 1324, Three Bond 1324 or equivalent |
★ | Precoated part |
PROCEDURE
1. INSTALL DOOR WINDOW FRAME MOULDING CLIP
2. INSTALL REAR DOOR DUST PROOF SEAL
3. INSTALL REAR DOOR PANEL CUSHION
4. INSTALL REAR DOOR WINDOW FRAME UPPER MOULDING
|
|
Click here |
5. INSTALL REAR DOOR WINDOW FRAME MOULDING(REAR PILLAR SIDE)
|
|
Click here |
6. INSTALL REAR DOOR WINDOW FRAME MOULDING(CENTER PILLAR SIDE)
|
|
Click here |
7. INSTALL REAR DOOR BELT MOULDING ASSEMBLY
8. INSTALL REAR DOOR OUTSIDE MOULDING SUB-ASSEMBLY
|
|
Click here |
9. INSTALL REAR DOOR OUTSIDE LOWER MOULDING SUB-ASSEMBLY
10. INSTALL HOLE PLUG
11. INSTALL REAR DOOR OUTSIDE HANDLE FRAME SUB-ASSEMBLY

.png) |
Screw |
.png) |
MP Grease |
.png) |
Install in this Direction |
- | - |
(1) Apply MP grease to the sliding parts of the rear door outside handle frame sub-assembly.
(2) Engage the guide to install the rear door outside handle frame sub-assembly as shown in the illustration.
(3) Using a T30 "TORX" socket wrench, tighten the screw
Torque:
4.0 N·m {41 kgf·cm, 35 in·lbf}
12. INSTALL REAR DOOR OUTSIDE HANDLE REAR PAD
13. INSTALL REAR DOOR OUTSIDE HANDLE FRONT PAD
14. INSTALL REAR DOOR OUTSIDE HANDLE COVER
Torque:
4.0 N·m {41 kgf·cm, 35 in·lbf}
15. INSTALL REAR DOOR OUTSIDE HANDLE ASSEMBLY
16. INSTALL REAR DOOR LOCK WITH MOTOR ASSEMBLY
|
|
Click here |
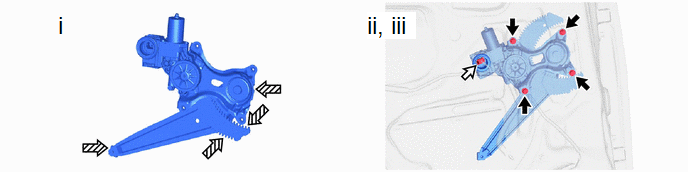
17. INSTALL REAR DOOR WINDOW REGULATOR ASSEMBLY
|
|
Bolt |
|
Connector |
|
|
MP Grease | - |
- |
(1) Apply MP grease to the sliding parts of the rear door window regulator assembly.
(2) Install the rear door window regulator assembly with the 4 bolts.
Torque:
8.0 N·m {82 kgf·cm, 71 in·lbf}
(3) Connect the connector.
18. INSTALL REAR DOOR GLASS SUB-ASSEMBLY
Torque:
8.0 N·m {82 kgf·cm, 71 in·lbf}
19. INSTALL REAR DOOR QUARTER WINDOW WEATHERSTRIP
20. INSTALL REAR DOOR QUARTER WINDOW GLASS
21. INSTALL REAR DOOR WINDOW DIVISION BAR SUB-ASSEMBLY
Torque:
8.5 N·m {87 kgf·cm, 75 in·lbf}
22. INSTALL REAR DOOR GLASS RUN
23. INSTALL REAR DOOR FRAME GARNISH
24. INSTALL REAR DOOR REAR BELT SEAL
25. INSTALL REAR DOOR FRONT BELT SEAL
26. INSTALL REAR DOOR GLASS INNER WEATHERSTRIP
27. INSTALL REAR DOOR WEATHERSTRIP
28. INSTALL REAR DOOR CHECK ASSEMBLY
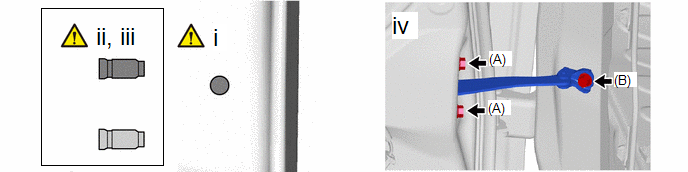
.png) |
Cleaning Area |
.png) |
Adhesive |
(1) Clean the bolt (B) hole in the vehicle body.
(2) Clean the threads of the bolt (B).
(3) Apply adhesive to the threads of the bolt (B).
Adhesive:
Toyota Genuine Adhesive 1324, Three Bond 1324 or equivalent
(4) Install the rear door check assembly with the 2 bolts (A) and bolt (B).
Torque:
Bolt (A) :
5.5 N·m {56 kgf·cm, 49 in·lbf}
Bolt (B) :
30 N·m {306 kgf·cm, 22 ft·lbf}
29. INSTALL REAR SPEAKER ASSEMBLY
|
|
Click here |
30. INSTALL REAR DOOR SERVICE HOLE COVER
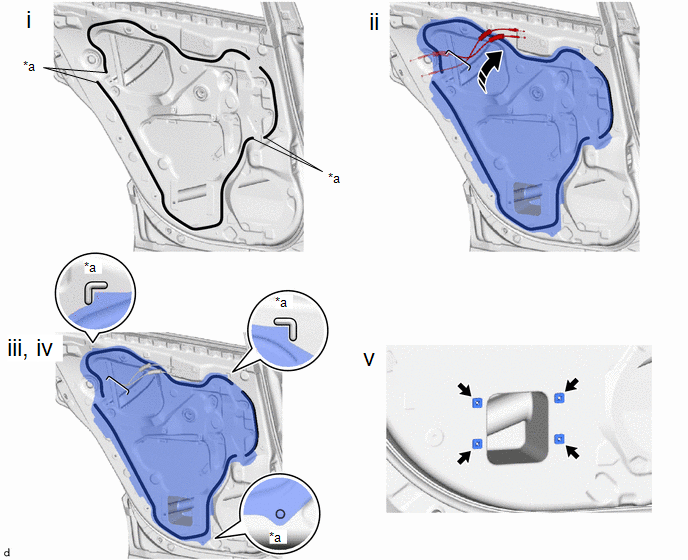
|
*a | Reference Point |
- | - |
 |
Butyl Tape |
|
Install in this Direction |
(1) Apply new butyl tape to the rear door panel.
HINT:
- Begin applying the butyl tape from the reference point shown in the illustration.
- The butyl tape can be applied from either reference point.
(2) Pass the rear door lock and unlock knob inside locking cable and open lever rear door lock remote control cable through a new rear door service hole cover.
(3) Align the top of the rear door service hole cover with the reference point on the rear door panel and install it.
(4) Align the bottom of the rear door service hole cover with the reference point on the rear door panel and install it.
NOTICE:
- Securely install the rear door service hole cover LH to prevent wrinkles and air bubbles.
- There should be no wrinkles or folds after installing the rear door service hole cover LH.
- After installing the rear door service hole cover LH, check the seal quality.
(5) Install the 4 grommets.
31. INSTALL REAR DOOR INSIDE PANEL REINFORCE SUB-ASSEMBLY
32. INSTALL REAR DOOR INSIDE HANDLE SUB-ASSEMBLY
33. INSTALL REAR DOOR TRIM BOARD SUB-ASSEMBLY
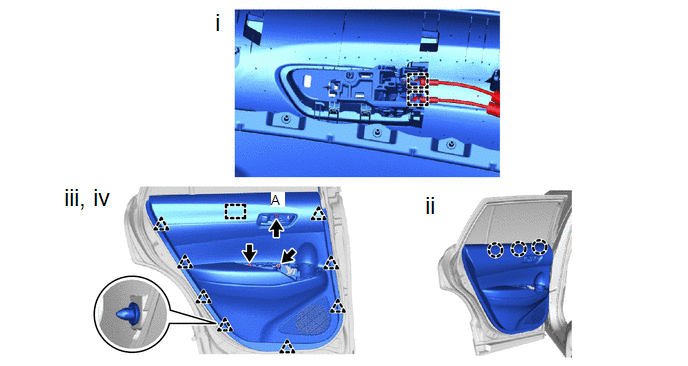
(1) Engage the guides to connect the open lever rear door lock remote control cable and rear door inside lock and unlock knob locking cable.
(2) Engage the claws.
(3) Engage the clips and guide to install the rear door trim board sub-assembly.
(4) Install the 3 screws.
Torque:
Screw A :
4.0 N·m {41 kgf·cm, 35 in·lbf}
34. INSTALL REAR POWER WINDOW REGULATOR SWITCH ASSEMBLY WITH REAR DOOR ARMREST BASE PANEL
35. INSTALL REAR DOOR INSIDE HANDLE BEZEL PLUG
36. CONNECT CABLE TO NEGATIVE AUXILIARY BATTERY TERMINAL
- for Gasoline Model
Click here
.gif)
- for HEV Model
Click here
37. INITIALIZATION AFTER RECONNECTING AUXILIARY BATTERY TERMINAL
HINT:
When disconnecting and reconnecting the auxiliary battery, there is an automatic learning function that completes learning when the respective system is used.
Click here
38. INITIALIZE POWER WINDOW CONTROL SYSTEM
Click here
39. INSPECT POWER WINDOW CONTROL OPERATION
Click here
40. INSPECT POWER DOOR LOCK CONTROL SYSTEM
Click here


